In this article, we will teach you how to pass value between 2 components in Vue JS. We will be using Vuex for this.
Video tutorial
Create a store
First, you need to create a store. To do this, install a module named vuex. Run the following command in your terminal:
npm install vuex
After that, you must create a folder named “vuex” in your “src” folder. Then, create a file named “store.js” inside “vuex” folder. Following will be the content of store.js file:
“variable” will be the variable that you need to pass between components. You can set its default value here.
Pass value to component 1
Let’s say you want to display the value in component 1. So I am going to create a simple paragraph tag to display a value.
<p v-text="variable"></p>
And we need to make this variable a computed property. So we will write the following Javascript code in component 1.
import store from "../vuex/store"

export default {
	computed: {
		variable: function () {
			return store.getters.getVariable
		}
	}
}
First, we are including the store file that we created in the previous step. Our component is in “src/components” folder, and store file is in “src/vuex”, so we have to move a step back using “../”.
Then we are created a computed property “variable”, and it returns the “getVariable” value from the store getters object. The getters is the built-in property in Vuex store. And “getVariable” will be a function that we need to create in our store file.
So write the following code in the [getters goes here] section of store.js file:
getters: {
	getVariable: function (state) {
		return state.variable
	}
}
It accepts a state object as an argument. And with this object, you can call the variables in the state() function create in the first step. Run the component 1 now and you will see the value “123” in your paragraph.
Pass value from component 2
Now support in your component 2, you want to change its value and it should reflect in component 1 as well. First, write the following code in the [mutations goes here] section of store.js file:
It accepts state and newValue as arguments. With the state object, you can change the values. And newValue is simply the new value that will be passed to it.
To call this function, we are going to create a simple button in our component 2.
Then we are going to create this method in our Javascript and call the setVariable function from our store file.
import store from "../vuex/store"

export default {
	methods: {
		updateVariable: function () {
			store.commit("setVariable", 567)
		}
	}
}
commit function from Vuex store will call the function created in mutations object. Second parameter will be the new value. Run the app now and click on the button. As soon as you press the button, you will notice that the variable value in 1st component will automatically get updated.
Source code
[wpdm_package id=’1733′]
Conclusion
So you have learned how to create a Vuex store in Vue JS, and how to pass value between components in Vue JS. If you face any problems in following this, kindly do let me know. We also created a chat application where we implemented this technique, so you will know how it is used practically in projects.
accept=”image/*”: This allows only image files to be uploaded.
Then we will create this Javascript function to call an AJAX.
<script>
    function uploadImages() {
        // prevent the form from reloading the page
        event.preventDefault()

        // get form tag
        const form = event.target

        // create form data object from <form>
        const formData = new FormData(form)

        // create AJAX object
        const ajax = new XMLHttpRequest()

        // 1st parameter = method, GET/POST
        // 2nd parameter = path to server file
        // 3rd parameter = asynchronous
        ajax.open("POST", "/uploadImages", true)

        // when status of request changes
        ajax.onreadystatechange = function () {
            // operation is completed
            if (this.readyState == 4) {
                // response from server is okay
                if (this.status == 200) {
                    // response from server
                    console.log(this.responseText)
                }
            }
        }

        // send AJAX request
        ajax.send(formData)
    }
</script>
Comments have been added with each line for the explanation.
Upload multiple images in Node JS
To handle the form data object, we must first install the express-formidable and fs modules. FS stands for File System. To install these modules, run the following command:
> npm install express-formidable fs
Then you need to include these modules in your server.js file, in the [Express formidable and FS module] section:
const formidable = require("express-formidable")
app.use(formidable({
    multiples: true, // request.files to be arrays of files
}))

const fileSystem = require("fs")
app.use("/uploads", express.static(__dirname + "/uploads"))
Then create a folder named uploads at the root of your project.
After that, create the following POST route to handle that AJAX request:
app.post("/uploadImages", async function (request, result) {
    const images = []
    if (Array.isArray(request.files.images)) {
        for (let a = 0; a < request.files.images.length; a++) {
            images.push(request.files.images[a])
        }
    } else {
        images.push(request.files.images)
    }

    callbackFileUpload(images, 0, [], async function (savedPaths) {
        await db.collection("images").insertOne({
            images: savedPaths
        })

        result.send("Images has been uploaded.")
    })
})
To upload images, we will be using a recursive function. So create a recursive function in the [recursive function to upload images] section:
function callbackFileUpload(images, index, savedPaths = [], success = null) {
	const self = this

	if (images.length > index) {

		fileSystem.readFile(images[index].path, function (error, data) {
			if (error) {
				console.error(error)
				return
			}

			const filePath = "uploads/" + new Date().getTime() + "-" + images[index].name

			fileSystem.writeFile(filePath, data, async function (error) {
				if (error) {
					console.error(error)
					return
				}

				savedPaths.push(filePath)

				if (index == (images.length - 1)) {
					success(savedPaths)
				} else {
					index++
					callbackFileUpload(images, index, savedPaths, success)
				}
			})

			fileSystem.unlink(images[index].path, function (error) {
				if (error) {
					console.error(error)
					return
				}
			})
		})
	} else {
		success(savedPaths)
	}
}
Run the project now and you see a form with an input file and a submit button. Select multiple images from your computer and hit submit. Once submitted, you will see your uploaded images in the “uploads” folder and a new document will be created in the Mongo DB images collection.
Show uploaded images
Now we need to show all uploaded images. First, change your home route in server.js to the following:
This will pass all the images from the first document of images collection to the home file. Now go to your home.ejs and write the following for loop to display all images:
Promises are created in Javascript to prevent the callback hell. But it came with its own problems and complexities. To deal with them, we were introduced to async and await commands. So today, we are going to teach you, how you can create a promise in Javascript, and how to call it using async/await command.
Video tutorial
Basic example of promise with async await
Let’s start with a basic example. We are going to create a simple Javascript function that will return a promise. The promise will call the callback function with a string value.
function doSomething() {
	return new Promise(function (callBack) {
		callBack("Response")
	})
}
To use the async and await commands, we need to create another function that will use these commands.
The function name will be prepended with async and the function that returns a promise i.e. doSomething() will be prepended with await command. In this case, the response variable should print “Response” that was called at line 3 of previous code.
Finally, we simply need to call the callDoSomething() to run the code.
callDoSomething()
Run the code now, and you will see “Response” in your browser console. Try change the string value of callBack parameter and you will see that it will be reflected in response variable in callDoSomething() function.
Practical example
Let’s move to a more practical example. Let’s say you want to call an AJAX request from the promise. And instead of receiving the response in a callback, you want to receive it using async/await command.
So go ahead and change the doSomething() function to the following:
function doSomething() {
	return new Promise(function (callBack) {
		const ajax = new XMLHttpRequest()
		ajax.open("POST", "server.php", true)

		ajax.onreadystatechange = function () {
			if (this.readyState == 4) {
				if (this.status == 200) {
					callBack(this.responseText)
				}
			}
		}

		const formData = new FormData()
		ajax.send(formData)
	})
}
The code is self-explanatory but if you want to know more about the XMLHttpRequest, we have created a separate detailed tutorial on this.
Then we will create a simple PHP file that will return a simple string as response. Create a new file named server.php and write the following code in it:
<?php

sleep(1);

echo "Response from server";
exit();
We are calling the sleep() function just to give it 1 second delay. If you run the code now, you will start seeing “Response from server” in the browser console.
If you have a website that is by default loads on HTTP, then this article is for you.
First, you need to open your .htaccess file from the root of your project.
If you do not have .htaccess file at the root, you need to manually create it in your main folder. Make sure to add the “.” dot at the beginning.
Then you need to write the following re-write condition and rule at the end of your .htaccess file.
# Redirect all http traffic to https
RewriteCond %{SERVER_PORT} 80
RewriteRule ^(.*)$ https://adnan-tech.com/$1 [R,L]
By default, the HTTP server loads on port 80. So, we have set the condition to port 80. Whatever comes to port 80, will be passed to the re-write rule.
Our re-write rule says that whatever comes in the URL of this website, will be redirected to the HTTPS address.
In this tutorial, we are going to show you, how you can copy or move a folder from one storage to another storage folder in Laravel.
Video tutorial
So let’s say in your storage/app/public folder, these folders are already created by Laravel by default. We created 2 folders named folder1 and folder2. In folder1, we have a folder named files and it has some files. Now you want to move the entire files folder with all his files in folder2.
storage/app/public
folder1
files
folder2
Copy folder from one storage to another – Laravel
Following will be the code that will copy the entire folder from one storage to another:
// include classes
use Storage;
use Str;

// get all files from source folder
$files = Storage::files("public/folder1/files");

// loop through each file
foreach ($files as $file)
{
    // to get the content the file, we need to get it from public/storage
    // so change the path to public/storage folder
    $file = Str::of($file)->replace("public/folder1/", "public/storage/folder1/");

    // get the content of file
    $file_content = file_get_contents($file);

    // extract the file name from path
    $file_name_parts = explode("/", $file);
    if (count($file_name_parts) > 0)
    {
        // name is at the last index of array
        $file_name = $file_name_parts[count($file_name_parts) - 1];

        // set destination path
        $file_path = "public/folder2/files/" . $file_name;

        // save the file in destination folder
        Storage::put($file_path, $file_content);
    }
}

// delete the source folder
// do this only if you want to move the folder
Storage::deleteDirectory("public/folder1/files");
Explanation
First, we are going to get all the files from the source folder.
Then we will loop through each file.
Then we need to get the content of each file. But in order to get the content of the Laravel storage file, we need to access it from a public shortcut path.
So to change the path, we are going to use another class named Str.
Then we need to call the function of and tell the target string and call the replace function. We will replace the “public/folder1/” (notice slash at the end) with the “public/storage/folder1/”. And save it back in the $file variable.
Now we can get the content of the file by calling the PHP native function file_get_contents and pass the path of the file, and save it in the variable $file_content. If you get any error here, you need to run the following command at the root of your project:
php artisan storage:link
Then we need to extract the file name from the file path. First, we will split the file path by slash using PHP explode function. It will return an array and we need to get the last index of this array. So we will check if the array is not empty. Then we will get the last index of the array. So if the length of the array is 5, minus 1 becomes 4, so it will fetch the element at index 4 which is the name of the file.
After that, we are setting the destination path. It will be in the public/folder2/files and the name of the file. Right now, folder2 does not have a files folder, but it will automatically create one. To save the file, we need to call the Storage::put method. Pass the destination path and the content of the file.
In order to have the move functionality, you simply need to remove the source folder after it has been copied. So after the foreach loop, we will call the deleteDirectory method from the Storage class and pass the path of the source folder.
If you run the code now, you will see that folder1 becomes empty but now folder2 has all the files.
If you are working on AJAX and are getting any errors, feel free to check our tutorial on how to check Laravel errors from AJAX requests.
So that’s how you can copy or move an entire folder from one storage to another in Laravel. If you face any problems in following this, kindly do let me know.
In this tutorial, we will teach you how to send email from a hosting email address using SMTP in PHP. Recently, Google has disabled its “less secure apps” option. This means that you can no longer send SMTP emails from your Gmail account.
So, today we are going to show you, how you can send SMTP emails from your own hosting email address.
Step 1: Login to cPanel
First step, is to login to your hosting provider and open cPanel. In your cPanel, search for “email” and goto “Email accounts”.
Step 2: Search email address
Then search for desired email address, from which you want to send emails and select “Check email”.
Step 3: Open mail client configurations
On the next page, you need to look for the section “Other webmail features” and click on the “Configure mail clients” box.
Step 4: Check SMTP details of your hosting email address
From here, you need to loop for the following configurations.
Step 5: Send SMTP email
Now, we need to install a library called PHPMailer. Open the command prompt at the root of your project and run the following command:
> composer require phpmailer/phpmailer
Make sure you have downloaded the composer from here. Write the following code in the file from where you want to send the email:
// Import PHPMailer classes into the global namespace
// These must be at the top of your script, not inside a function
use PHPMailer\PHPMailer\PHPMailer;
use PHPMailer\PHPMailer\SMTP;
use PHPMailer\PHPMailer\Exception;

//Instantiation and passing `true` enables exceptions
$mail = new PHPMailer(true);

try
{
    //Enable verbose debug output
    $mail->SMTPDebug = 0; // SMTP::DEBUG_SERVER;

    //Send using SMTP
    $mail->isSMTP();

    //Set the SMTP server to send through
    $mail->Host = "mail host address";

    //Enable SMTP authentication
    $mail->SMTPAuth = true;

    //SMTP username
    $mail->Username = "email address";

    //SMTP password
    $mail->Password = "password";

    //Enable TLS encryption;
    $mail->SMTPSecure = PHPMailer::ENCRYPTION_STARTTLS;

    //TCP port to connect to, use 465 for `PHPMailer::ENCRYPTION_SMTPS` above
    $mail->Port = 587;

    //Recipients
    $mail->setFrom("email address", "your name");

    //Add a recipient
    $mail->addAddress("recipient email address", "recipient name");

    //Set email format to HTML
    $mail->isHTML(true);

    $mail->Subject = "subject";
    $mail->Body    = "body";

    $mail->send();
    echo 'Message has been sent';
}
catch (Exception $e)
{
    die("Message could not be sent. Mailer Error: " . $mail->ErrorInfo);
}
So that’s it. That’s how you can send emails from your hosting email address using SMTP in PHP. If you want to attach files with the email, we have already created a separate tutorial on that. If you face any problems in following this, kindly do let me know.
You will see a message saying the “Server started running at port: 3000”. You can access your server from the following URL:
http://localhost:3000
Now, we need to install the module for displaying views. And to get input from form fields. So, install the following modules:
> npm install ejs fs express-formidable
EJS module is used for displaying the HTML files. FS stands for File System, this module is used to handle files. And “express-formidable” is used for getting values from the input field. Make sure to run the “nodemon server.js” command again.
Install compress image module in Node JS
To install a module to compress image in Node JS, you need to run the following command in your terminal:
Now, write the following lines in the [get route goes here] section:
app.get("/", function (request, result) {
	result.render("index")
})
After that, you need to create a folder named “views” at the root of your project. And in that folder, create a file named “index.ejs”. Following will be the code of “index.ejs”:
It will display a simple HTML form with an input field and a submit button. Then, you need to create a POST route that will handle this request. The following code goes in the [post route goes here] section of the “server.js” file:
app.post("/compressImage", function (request, result) {
    const image = request.files.image
    if (image.size > 0) {

        if (image.type == "image/png" || image.type == "image/jpeg") {
            fileSystem.readFile(image.path, function (error, data) {
                if (error) throw error

                const filePath = "temp-uploads/" + (new Date().getTime()) + "-" + image.name
                const compressedFilePath = "uploads/"
                const compression = 60

                fileSystem.writeFile(filePath, data, async function (error) {
                    if (error) throw error

                    compressImages(filePath, compressedFilePath, { compress_force: false, statistic: true, autoupdate: true }, false,
                        { jpg: { engine: "mozjpeg", command: ["-quality", compression] } },
                        { png: { engine: "pngquant", command: ["--quality=" + compression + "-" + compression, "-o"] } },
                        { svg: { engine: "svgo", command: "--multipass" } },
                        { gif: { engine: "gifsicle", command: ["--colors", "64", "--use-col=web"] } },
                        async function (error, completed, statistic) {
                            console.log("-------------")
                            console.log(error)
                            console.log(completed)
                            console.log(statistic)
                            console.log("-------------")

                            fileSystem.unlink(filePath, function (error) {
                                if (error) throw error
                            })
                        }
                    )

                    result.send("File has been compressed and saved.")
                })

                fileSystem.unlink(image.path, function (error) {
                    if (error) throw error
                })
            })
        } else {
            result.send("Please select an image")
        }
    } else {
        result.send("Please select an image")
    }
})
The last thing you need to do is to create two folders named “uploads” and “temp-uploads” at the root of your project. Here, all compressed images will be stored.
This will compress the image up to 60%. You can now try to select an image from the input file and hit “Compress image”. You will see a success message if everything goes right. And you will see your compressed image in the “uploads” folder.
Real-world example
We implemented this compression in one of our projects, so you can get the real-world example of image compression in Node JS.
So that’s how you can compress an image in Node JS. If you face any problems in following this, kindly do let us know.
In this article, we are going to provide you with a free course to develop a full-fledged real-time chat app in MEVN (MongoDB, Express, Vue JS, and Node JS) Stack. Here M stands for MongoDB which we have used as a database. E stands for Express which is a Node JS framework. V stands for Vue JS which will be our front end. We will be creating a single-page application in Vue JS. And N stands for Node JS which will be our backend.
You can download Node JS from here. And Mongo DB from their official site.
Features
Free
Premium $100
Sign up
Yes
Yes
Login/logout
Yes
Yes
Add contacts
Yes
Yes
Private chat
Yes
Yes
Message encryption
Yes
Yes
Chat with attachment
Yes
Yes
Realtime chat
Yes
Yes
Email verification
No
Yes
Reset password
No
Yes
User profile
No
Yes
Chat with emojis
No
Yes
Bookmark messages
No
Yes
Copy message
No
Yes
Archive chat with password
No
Yes
Group chat
No
Yes
Notifications page
No
Yes
Customer support
No
Yes
We will do the deployment of this app on live servers. You can find the link to all the tutorials of this series here. Following are the topics we have covered in this series.
Installation of Node JS server
server started
In the very first tutorial, we have done the installation of the Node JS server. We also connect our Node JS server with MongoDB. You can find the tutorial here.
Setup Vue JS CLI – A single page application
vue js
Then we set up our Vue JS app using CLI. We used Vue JS CLI because we will be creating a single page application. We will be using Vue 3. Right now, we will be using the app on the local server. But once it is done, we will teach you how you can create a production build of it. And also how you can make it live on your website. This tutorial can be found here.
Routing for single page application
As this is a single page application, so we will be doing routing using Vue components. You can learn how to implement routing in a single page Vue JS app from this tutorial.
Hello world
footer
In this part, we will learn how to integrate Bootstrap into your Vue app. So you can design the theme as per your choice. We also show you how you can create header and footer layouts in Vue JS. The header and footer will be displayed on each page. For the header, we will be creating a simple Bootstrap navbar. And for the footer, we will simply be displaying copyright text and the current year dynamically.
Registration
register
You will learn how to display a form using Vue JS. Sends the form values to the Node JS server. And how Node JS can save the data in the MongoDB database. You will also learn how to check if certain data exists in MongoDB or not. Moreover, you will also learn how to encrypt the passwords before saving them in MongoDB. So even if your database gets stolen, your user’s passwords will remain unknown to the hacker.
One more thing you will learn in this part is how to deal with CORS (Cross-Origin Resource Sharing) errors in the Node JS server.
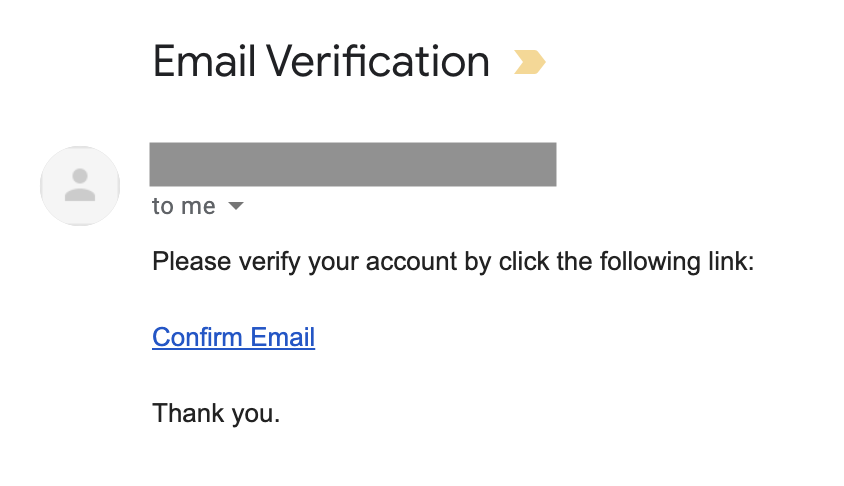
Email verification
Email verification, reset the password, user profile – Vue JS, Node JS, Mongo DB
After successful registration, an email will be sent to the user’s email address. That email will have the verification code. And the user will be redirected to a page where he can enter his verification code.
He will not be able to log in until he verifies his email address.
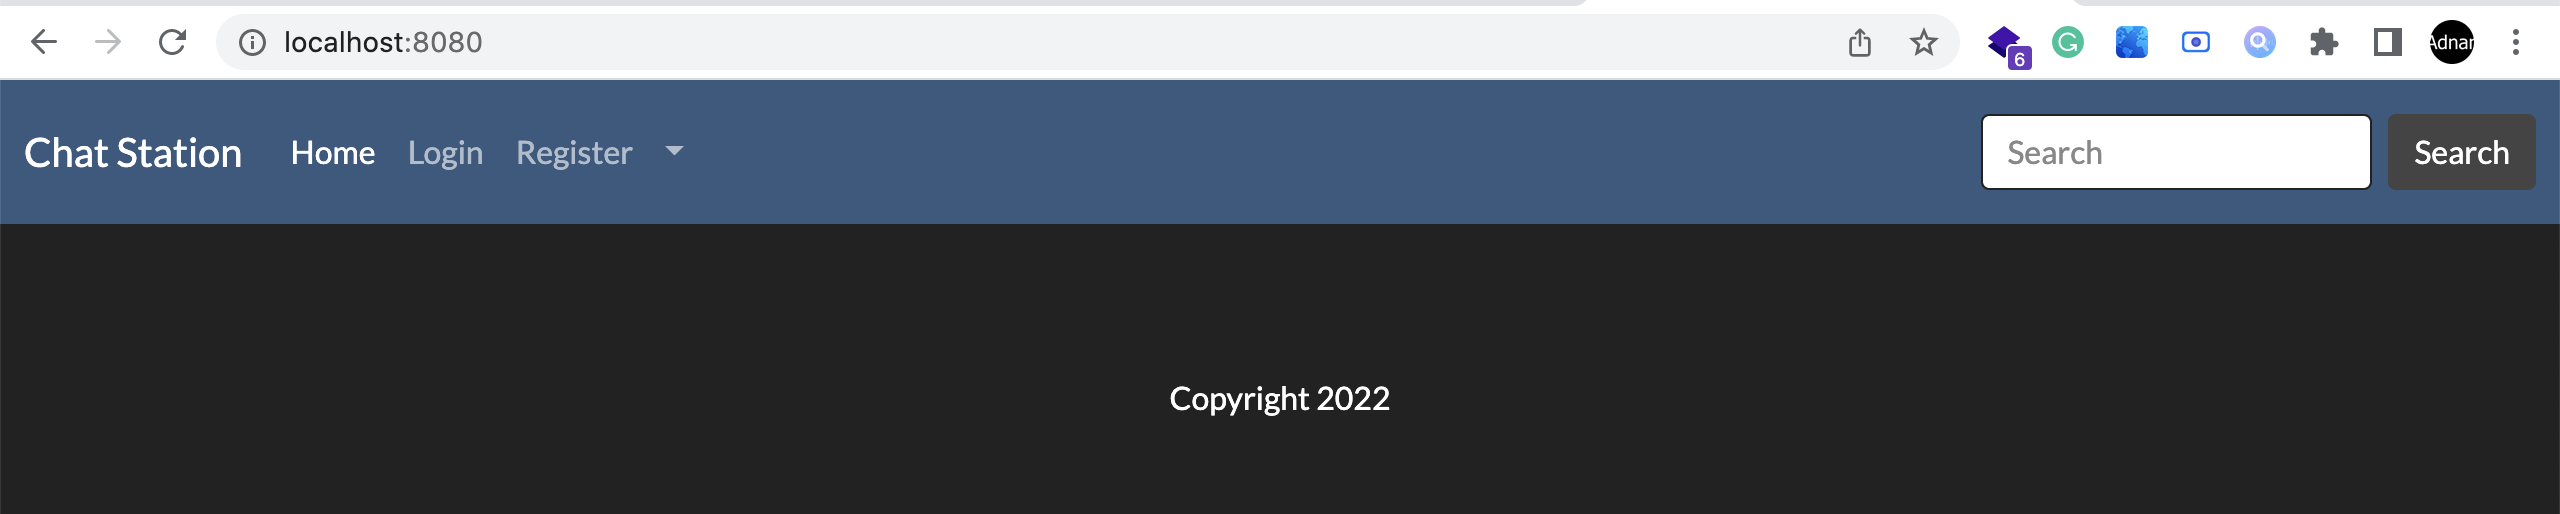
Login
In this part, we do the authentication. You will learn how to generate JWT (JSON Web Tokens) and how to store them in local storage for future usage. You will also learn how to validate the encrypted passwords saved in MongoDB while authenticating.
Reset Password
If a user forgets his password, he can reset it. He just needs to enter his email address. An email will be sent to him with a link to reset the password. When he clicks that link, he will be redirected to a page where he can enter his new password.
Get logged-in user’s data
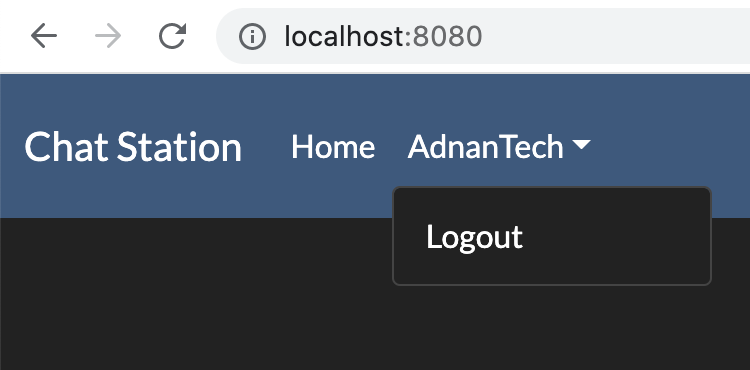
user name navbar
We will learn how to call AJAX with headers in Vue JS. How Node JS server read the headers? And how to create middleware in Node JS.
Logout
local storage empty
We will teach you how to log out as a user from MongoDB and from the Vue JS client app. We will remove the JWT token we create in the login part.
Contacts
add contact success
To chat with people, we need to add them to our contacts. We will be creating separate components in the Vue JS app for adding and displaying all contacts. We will also be creating a new module in the Node JS server. You will learn how to insert data in a nested array in MongoDB.
We will be calling AJAX requests using Axios in Vue JS. While deleting a contact, you will learn how to ask for confirmation using sweet alert dialogs.
delete contact confirmation
You will also learn how to remove an element from a nested array in MongoDB.
Chat with attachments
This is the main module of this app. We advise you to please put more focus on this part. It teaches you how to import CSS in specific Vue components only. How to send input type file from the Vue JS app to the Node JS server. How Node JS saves files on the server.
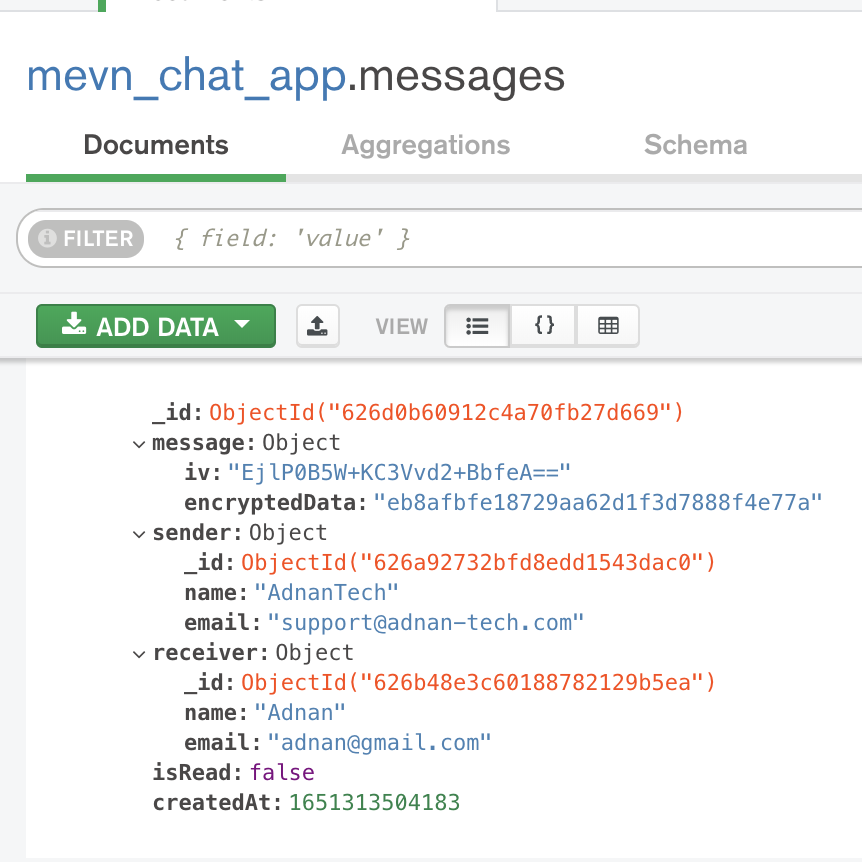
Encryption and Decryption
messages collection
We are saving messages in MongoDB in encrypted form. While fetching the messages, we are again decrypting the messages back to their original state. Even if someone has access to your database, he will not be able to read your messages. Because he does not have the key. The key will only be stored on the Node JS server.
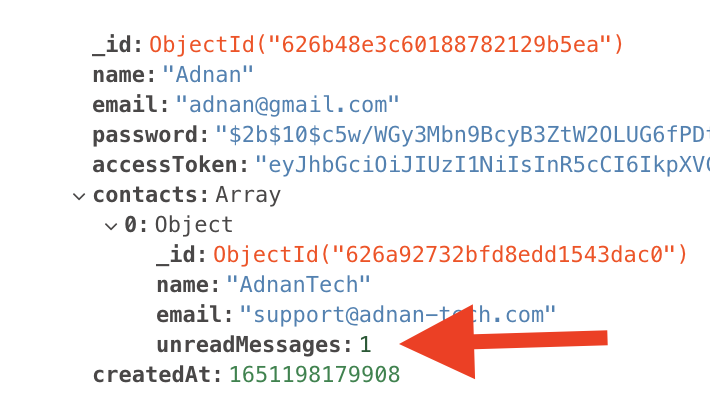
You can see the messages are fully encrypted. On the home page, where we are displaying all user’s contacts, we will also be displaying unread messages from each contact.
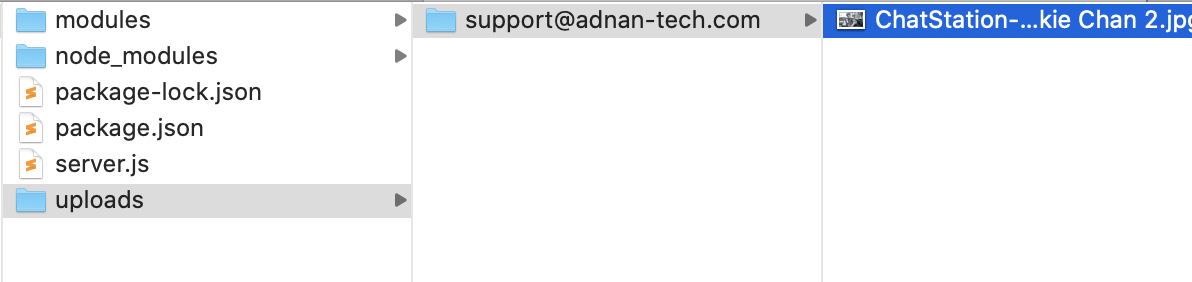
Attachments uploaded with messages are also protected from direct URL access. So we will show you how you can convert a file in base64 string using Node JS. And download them to your system using the Vue JS app.
attachment uploads
Realtime chat using Socket IO
realtime new message toast
Chat will be real-time. Meaning users do not have to refresh the page to see new messages. He will automatically receive a notification. If the chat is opened, then the incoming message will be appended automatically.
We have “load more” functionality. This means that we will only show 10 messages in each AJAX call. To get the previous 10 messages, the user will click on that button and we will fetch 10 more messages. So you will learn pagination using Node JS and Mongo DB too.
Deploy Node JS, Mongo DB, and Vue JS apps
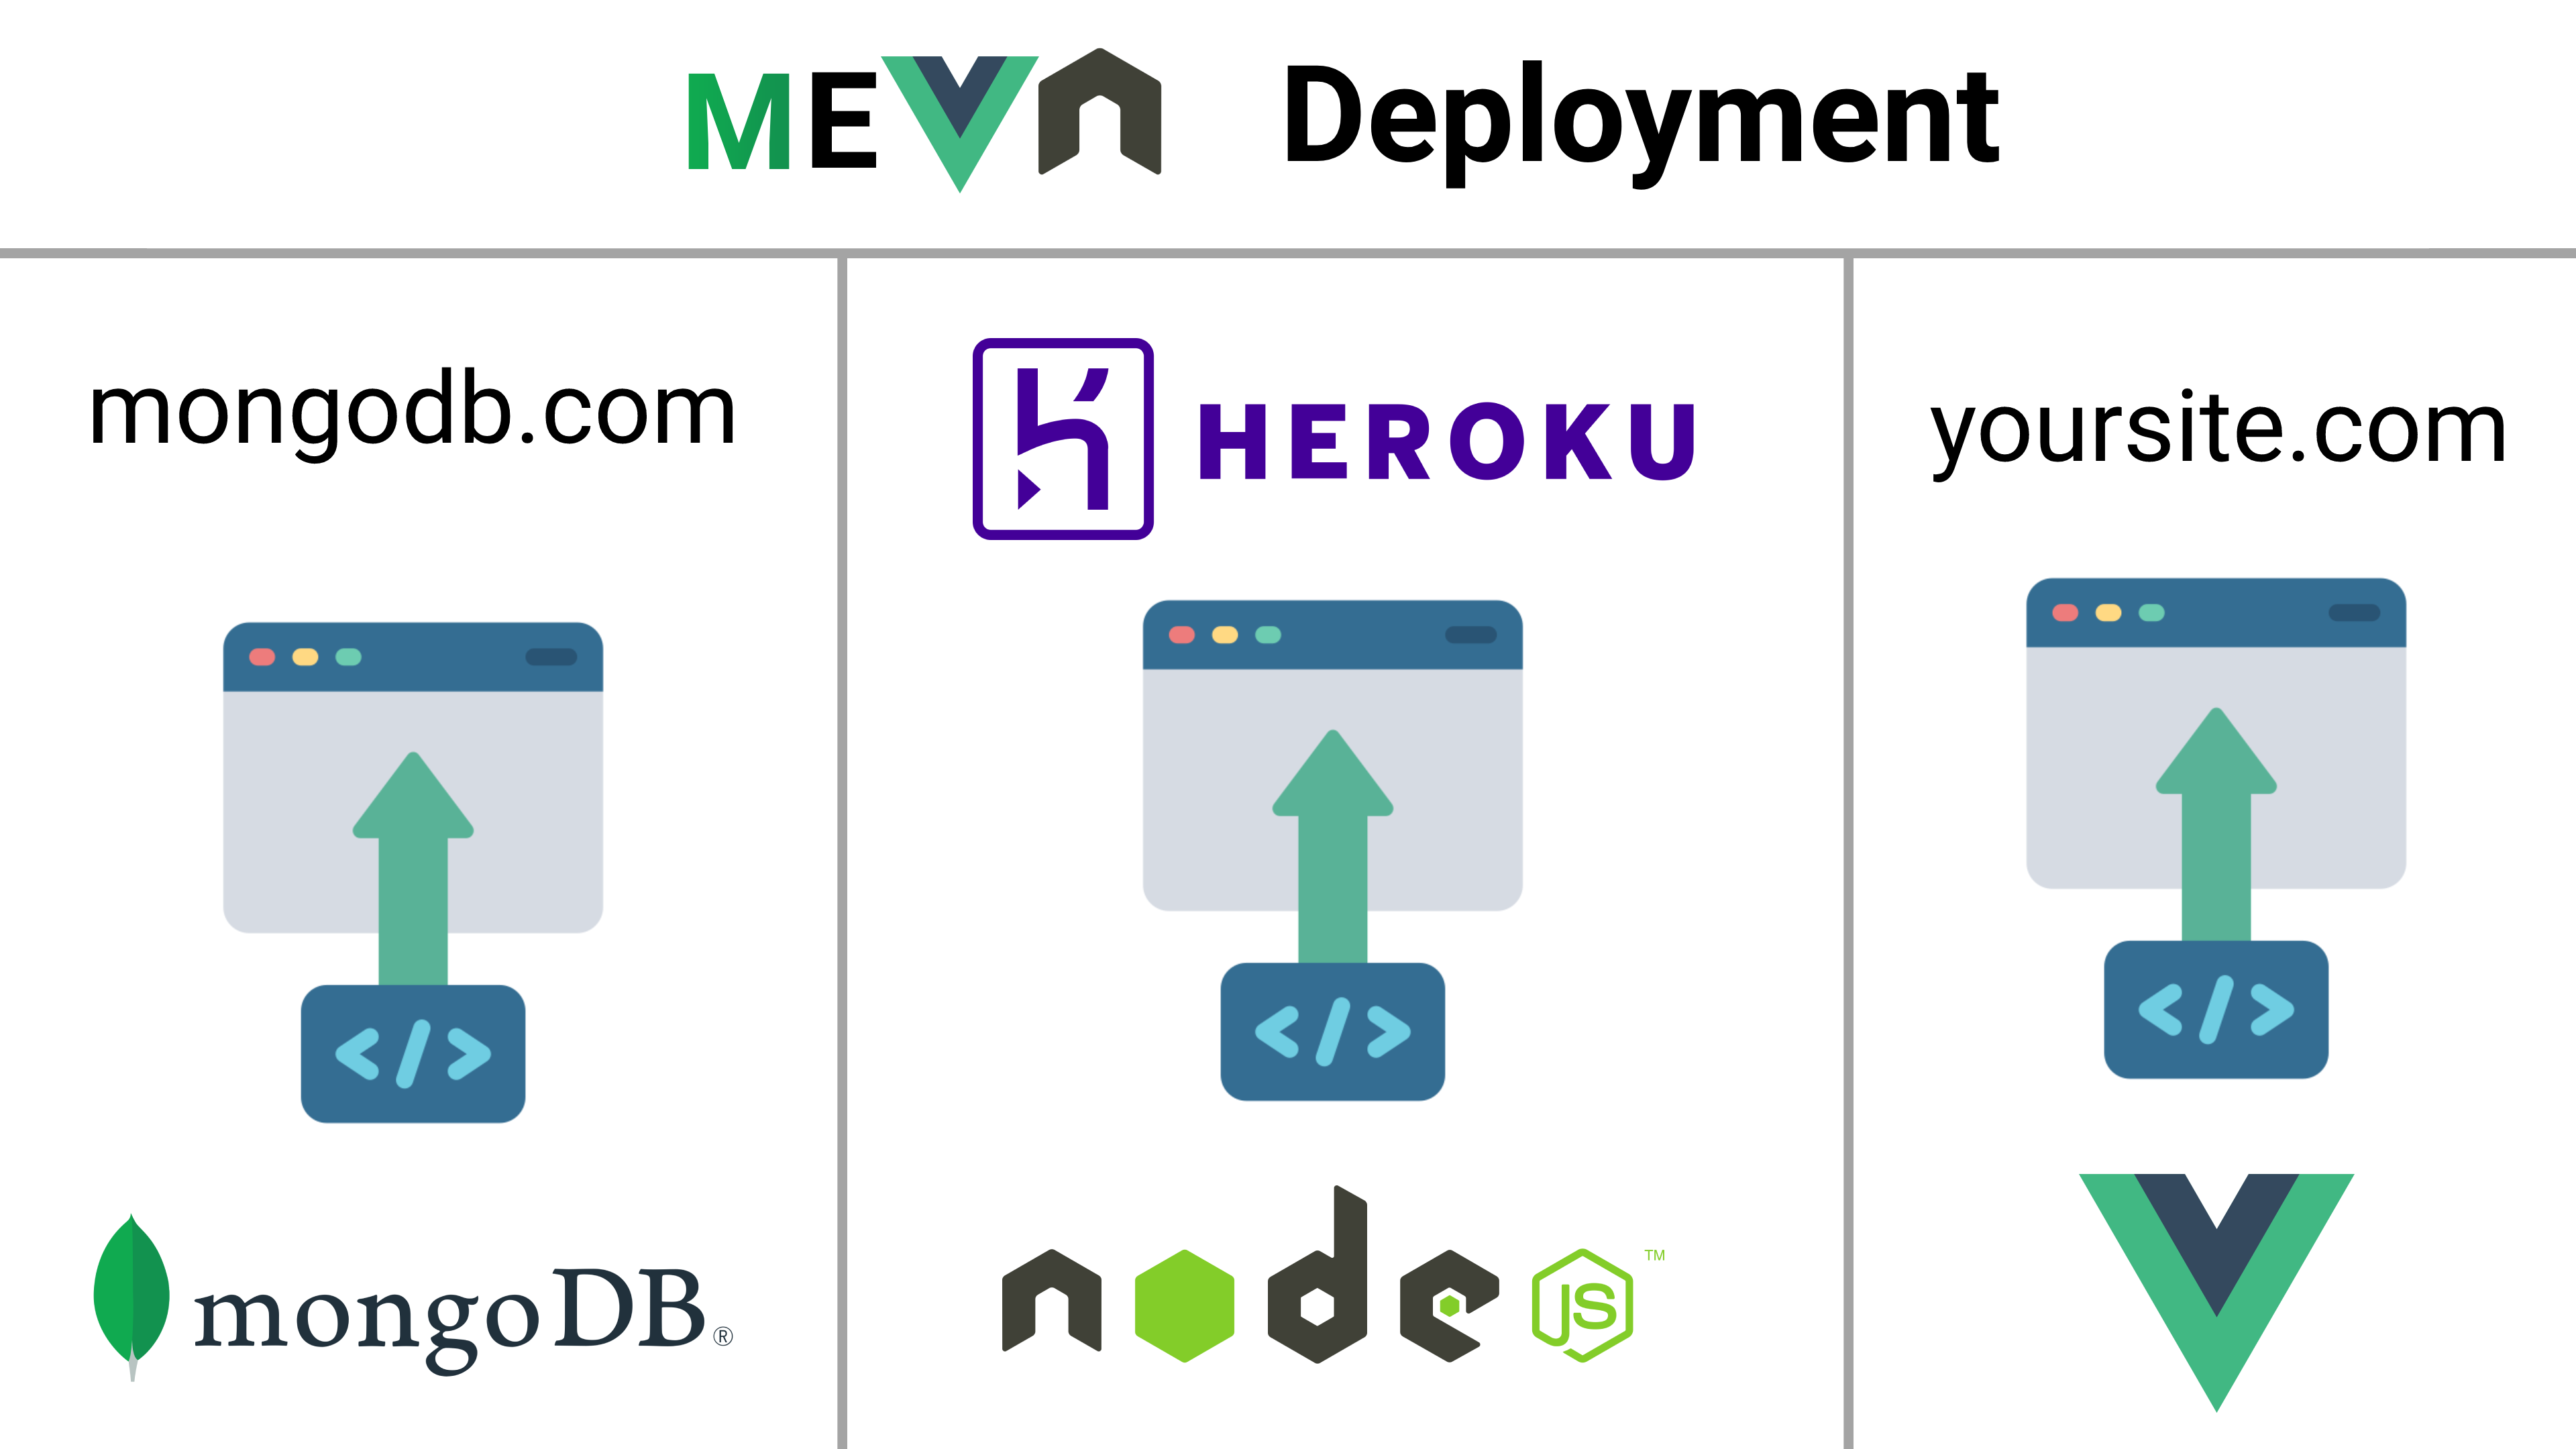
Deploy Node JS on Heroku, Mongo DB, and Vue JS
We will be deploying our Node JS server on Heroku. You can check our Heroku guide here. We will be deploying MongoDB on mongodb.com. And we will be deploying our Vue JS app on any hosting provider we choose. For example, a2hosting, Bluehost, Siteground, etc. We will create a production-ready build of our Vue JS app and upload it on our live server.
However, you might face some problems going live. That’s why we have written a detailed complete tutorial on the deployment on all these 3 platforms.
Search Contact
You can search your contacts by their email address. Searching with their email address points you to the right person. Because multiple people can have the same name. But email is unique in the entire “users” collection in MongoDB.
Group chat
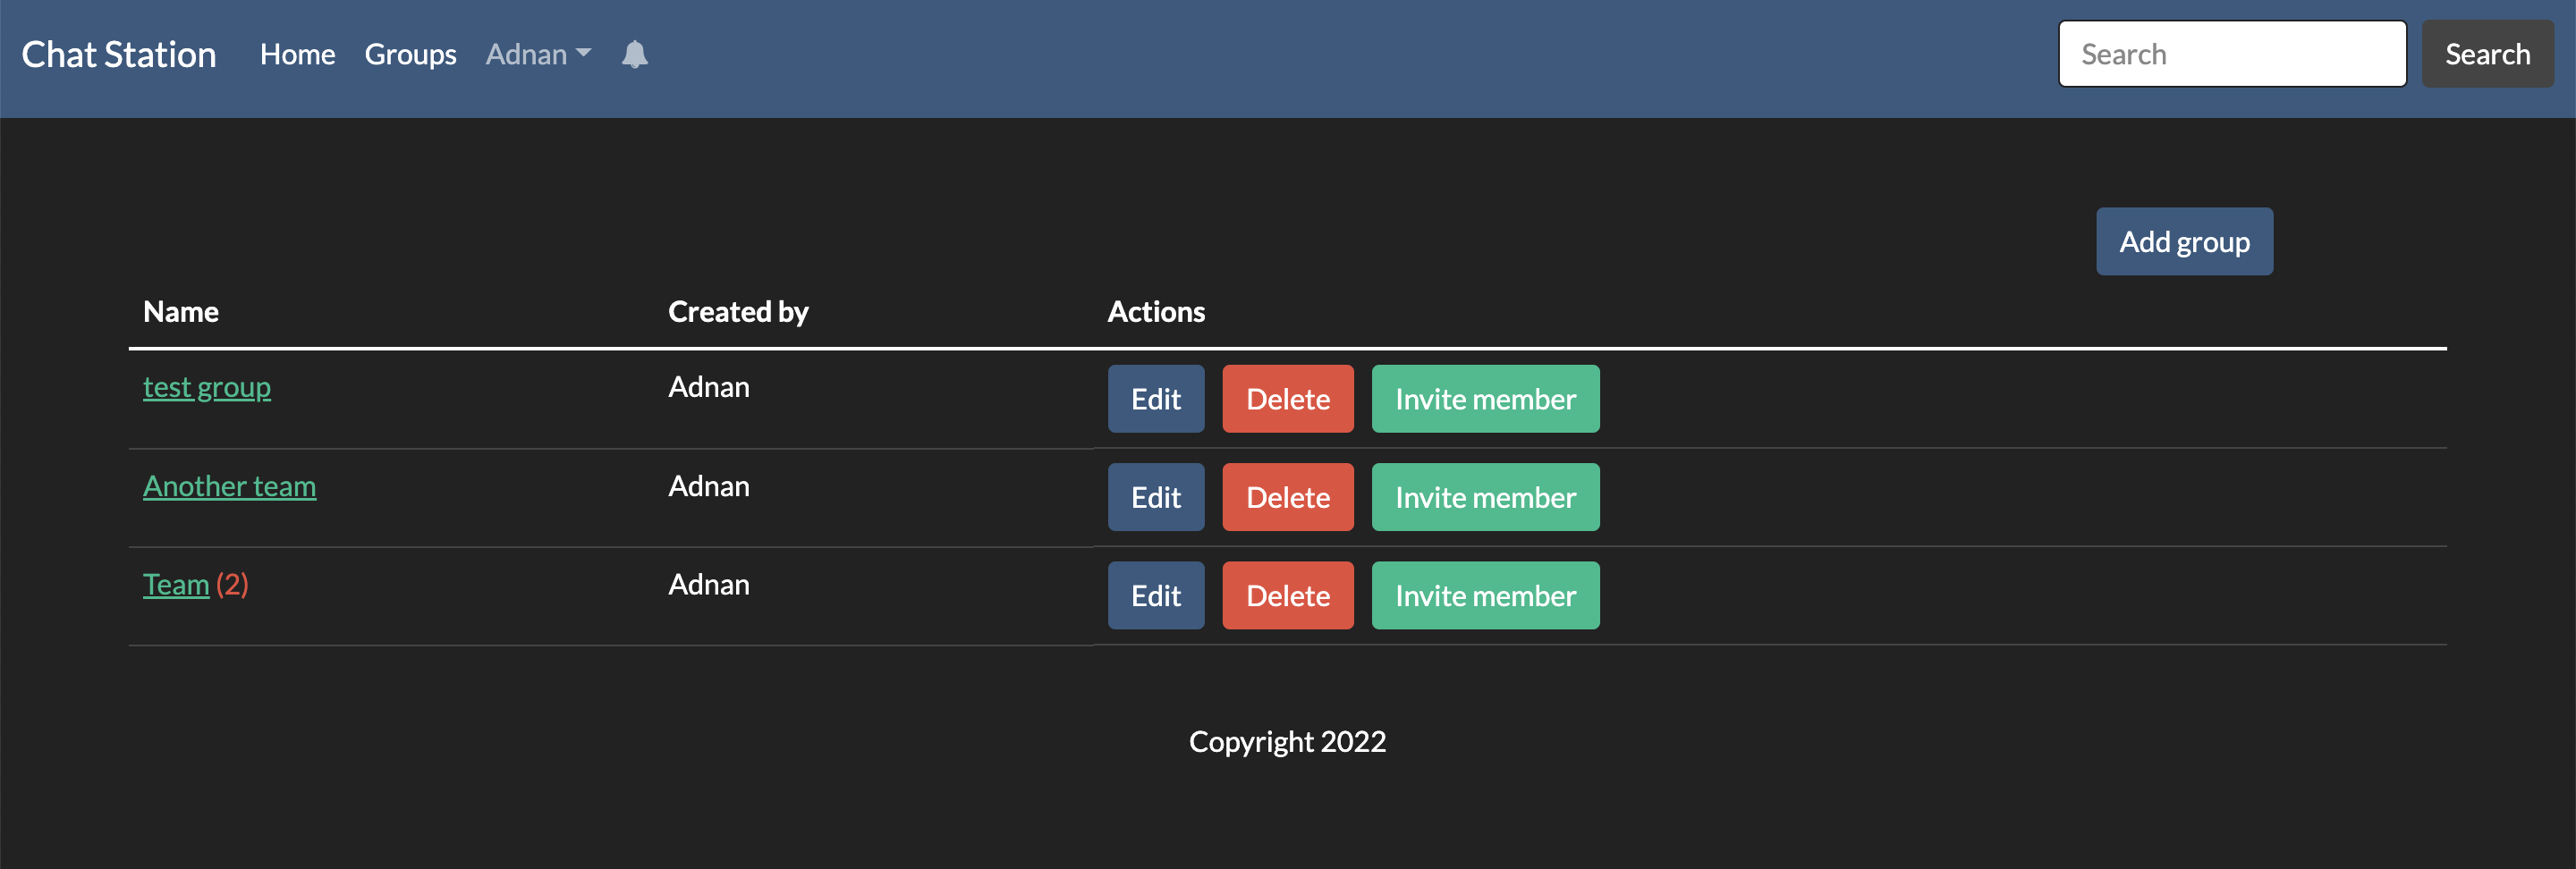
group unread messages
Previously we discussed private chat. In this tutorial series, we also cover the group chat feature. You will be able to create groups. Add members to the groups. You will be sending an invitation to the members to join the group. The other person can accept your request to join the group or can ignore it.
Any member can leave the group anytime he wants. But this is not the case for admins. For the admin to leave the group, he must first assign someone else to the admin of the group. The other person must be a member of the group. After assigning someone else as an admin, he can easily leave the group.
People who are not members or the admin of the group, cannot send or view the messages in the group chat.
The chat in the group is also real-time. All the other members of the group will get a notification when someone sends a message. If they have opened the group, then the new message will automatically get appended at the end of the chat.
Group chat is also end-to-end encrypted.
And same as we did for private chat, we are displaying several unread messages from a group on the page where we are displaying all groups.
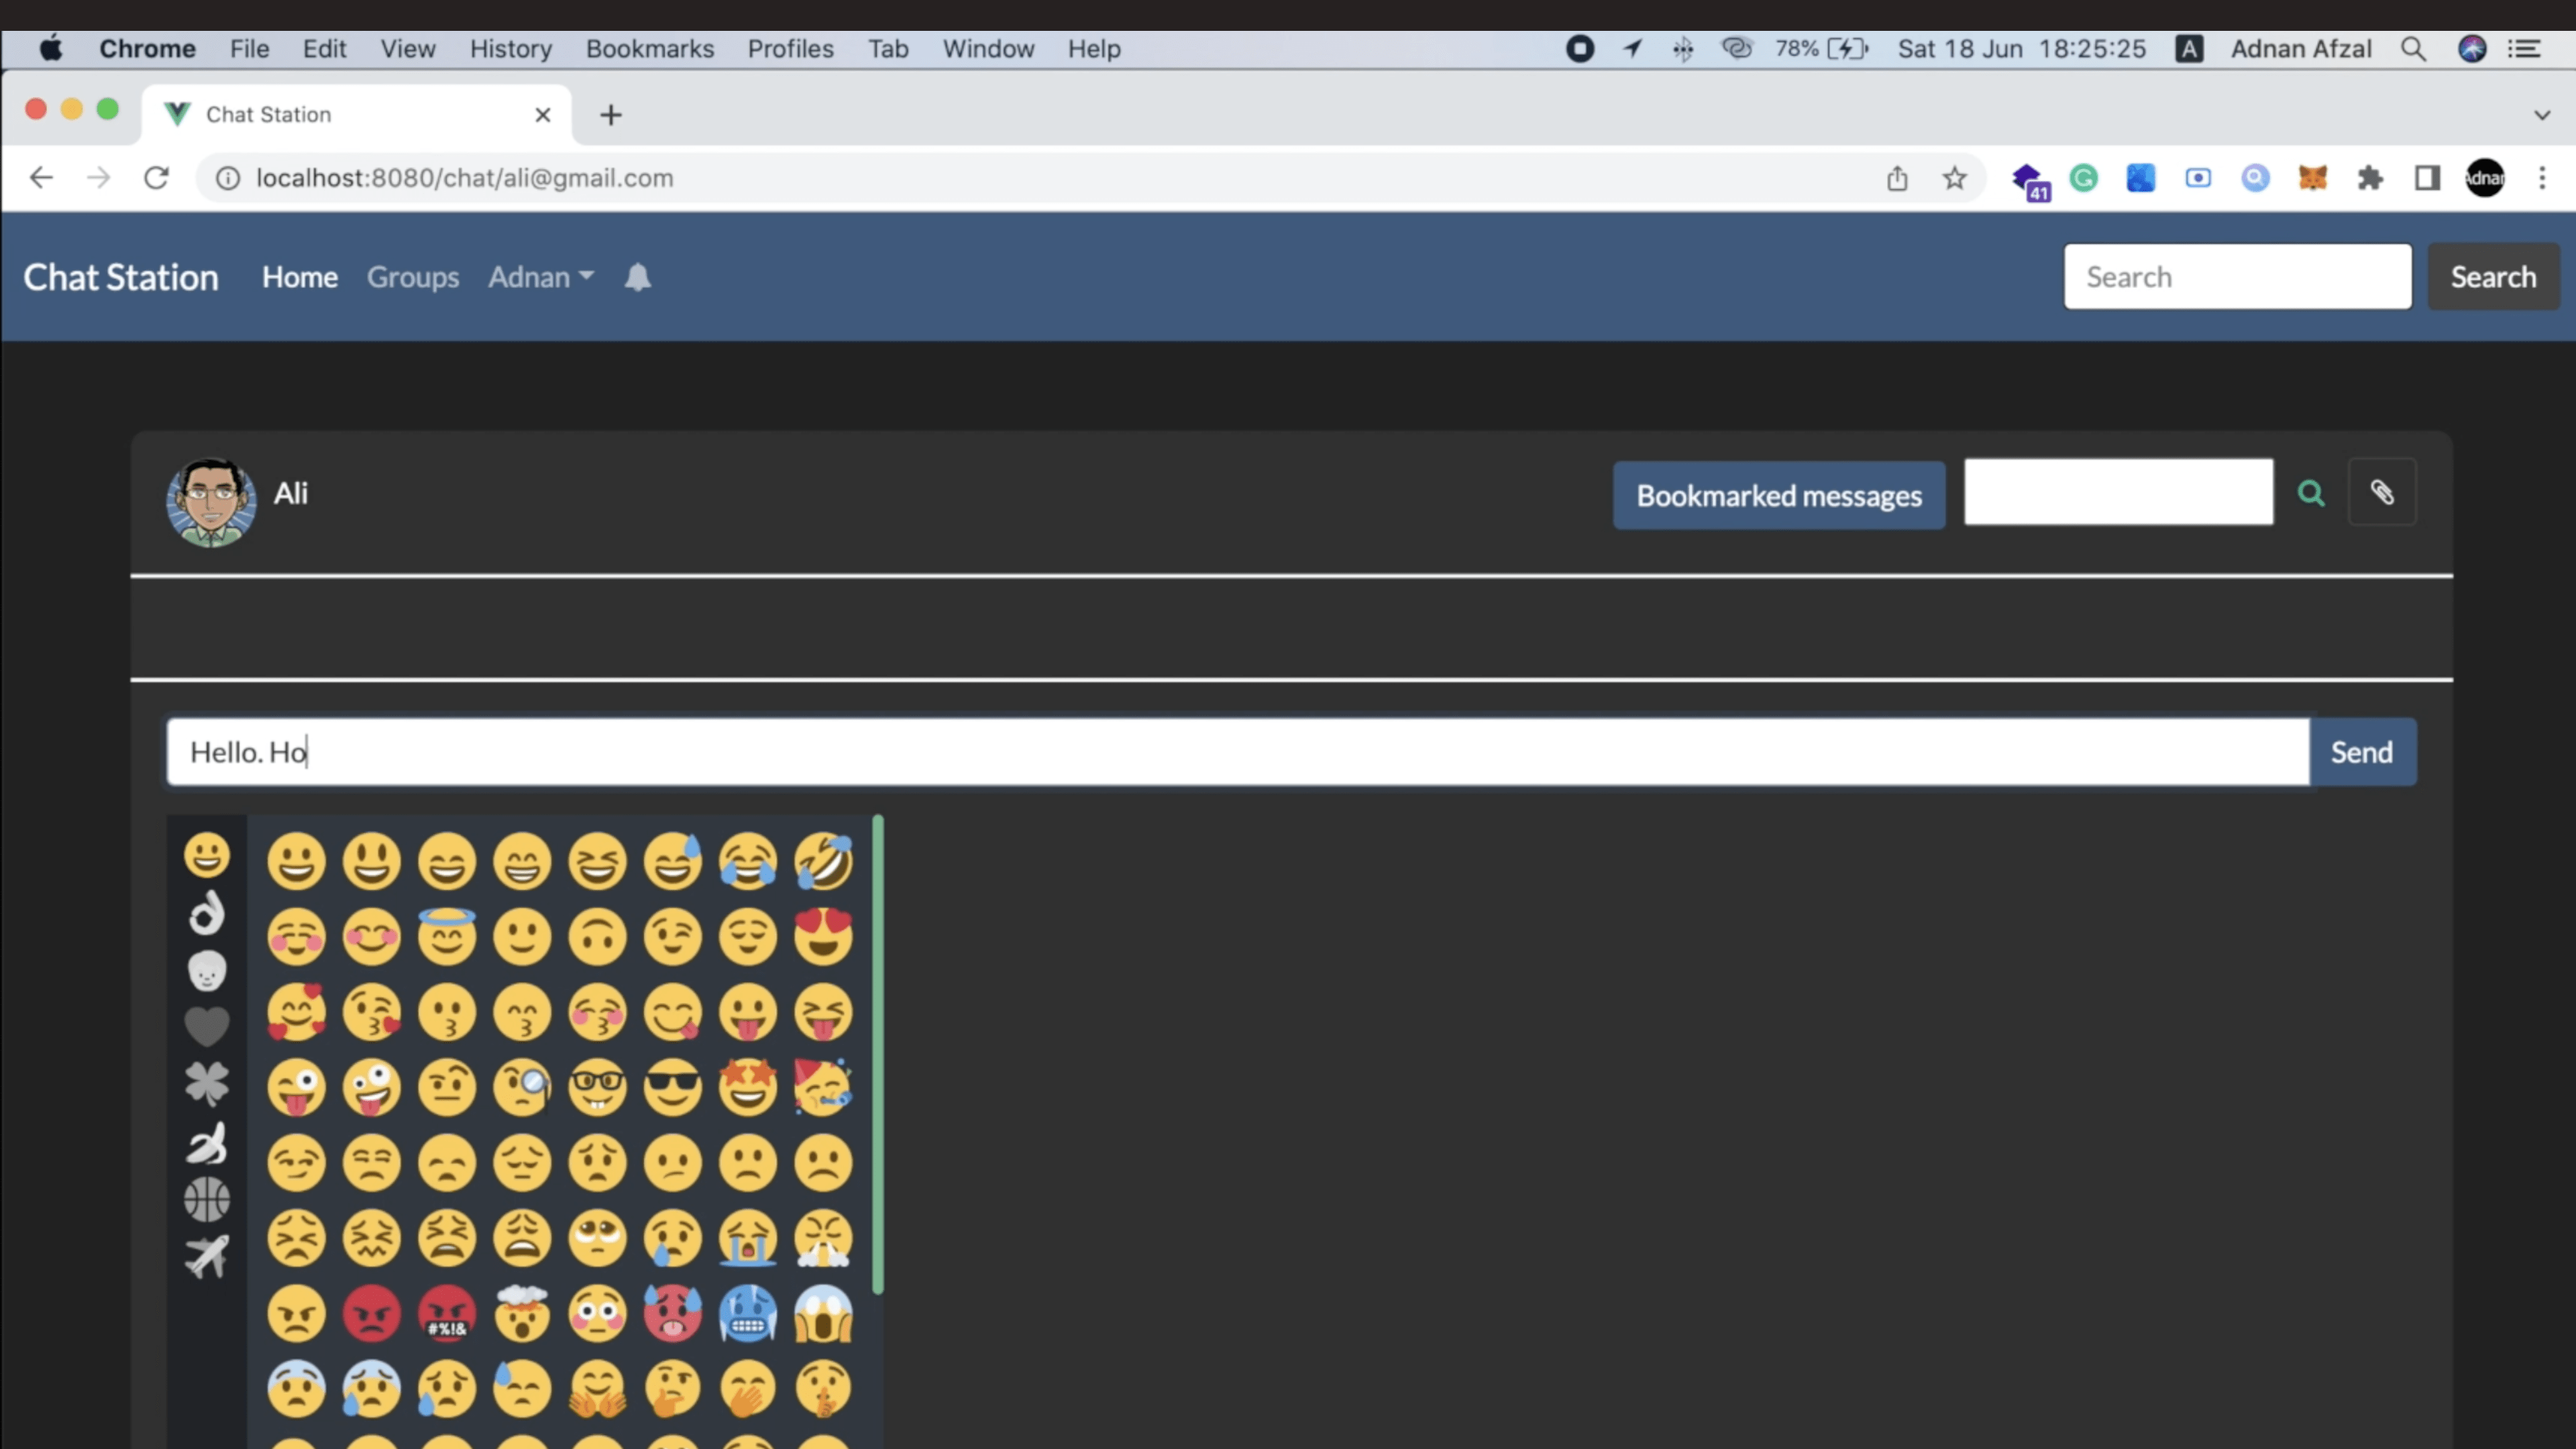
Emojis
In chat, you can also send emojis to the recipient. Emojis are also encrypted.
Bookmark message
You can also bookmark your favorite messages. This way, you can always see your bookmarked messages whenever you want. You can bookmark your messages as well.
Copy message
If someone sends you a lengthy message, like an essay. You can copy the whole message with a single click.
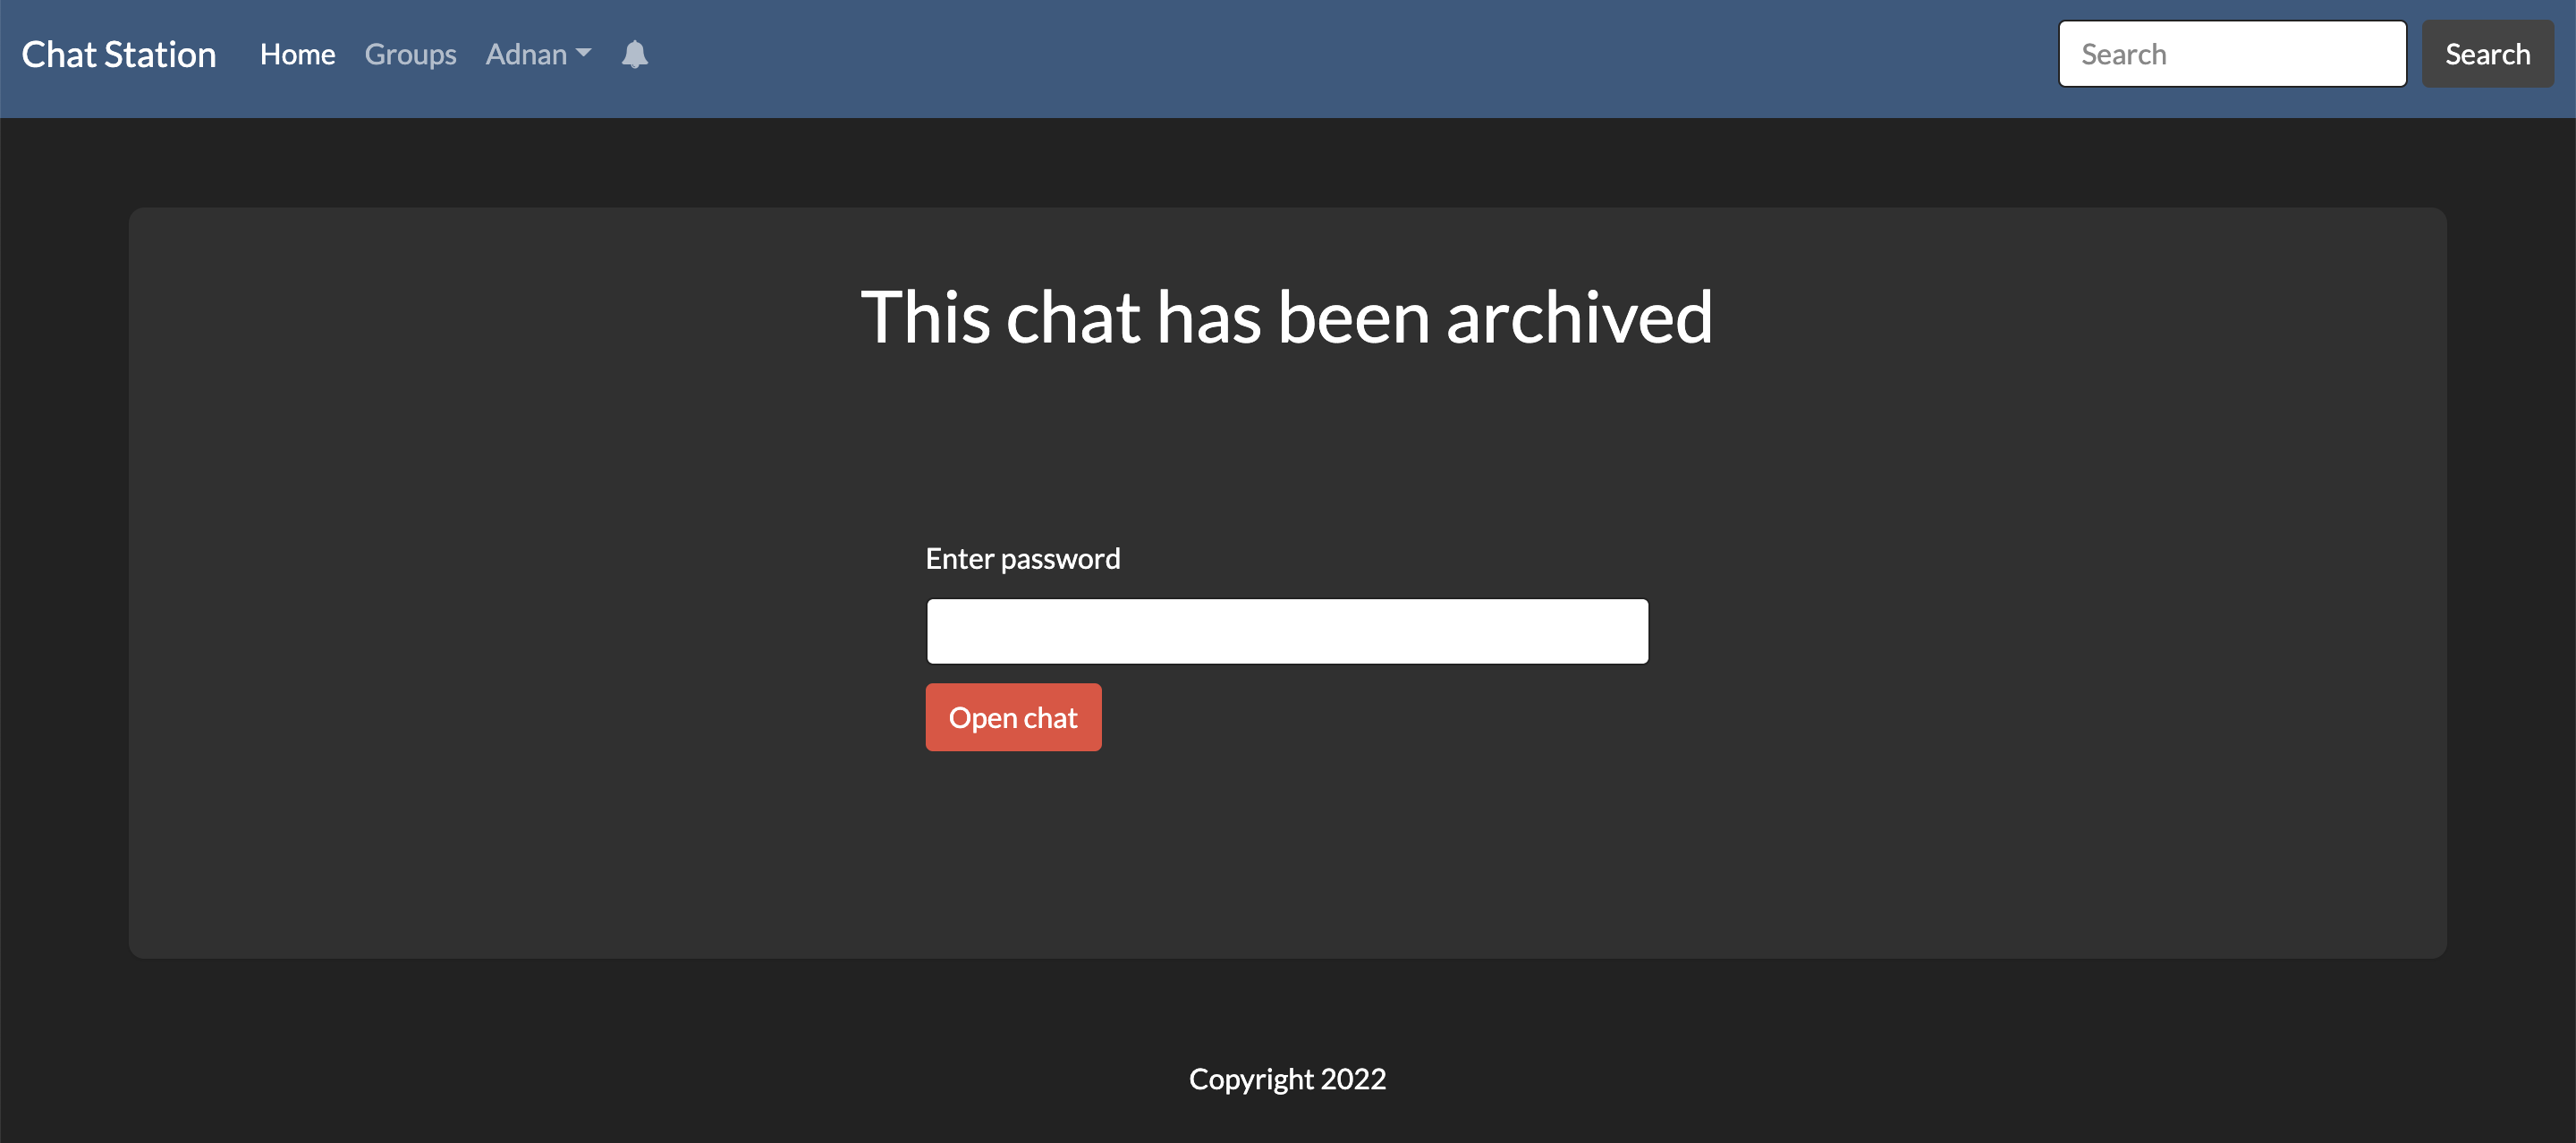
Archive chat with password
You can archive your private chat with a password.
Once archived, no one will be able to view the chat.
To view the chat, you must provide the correct password.
You can remove the password by simply entering the correct password.
Archived chats cannot be deleted. You must first un-archive the chat, then delete it.
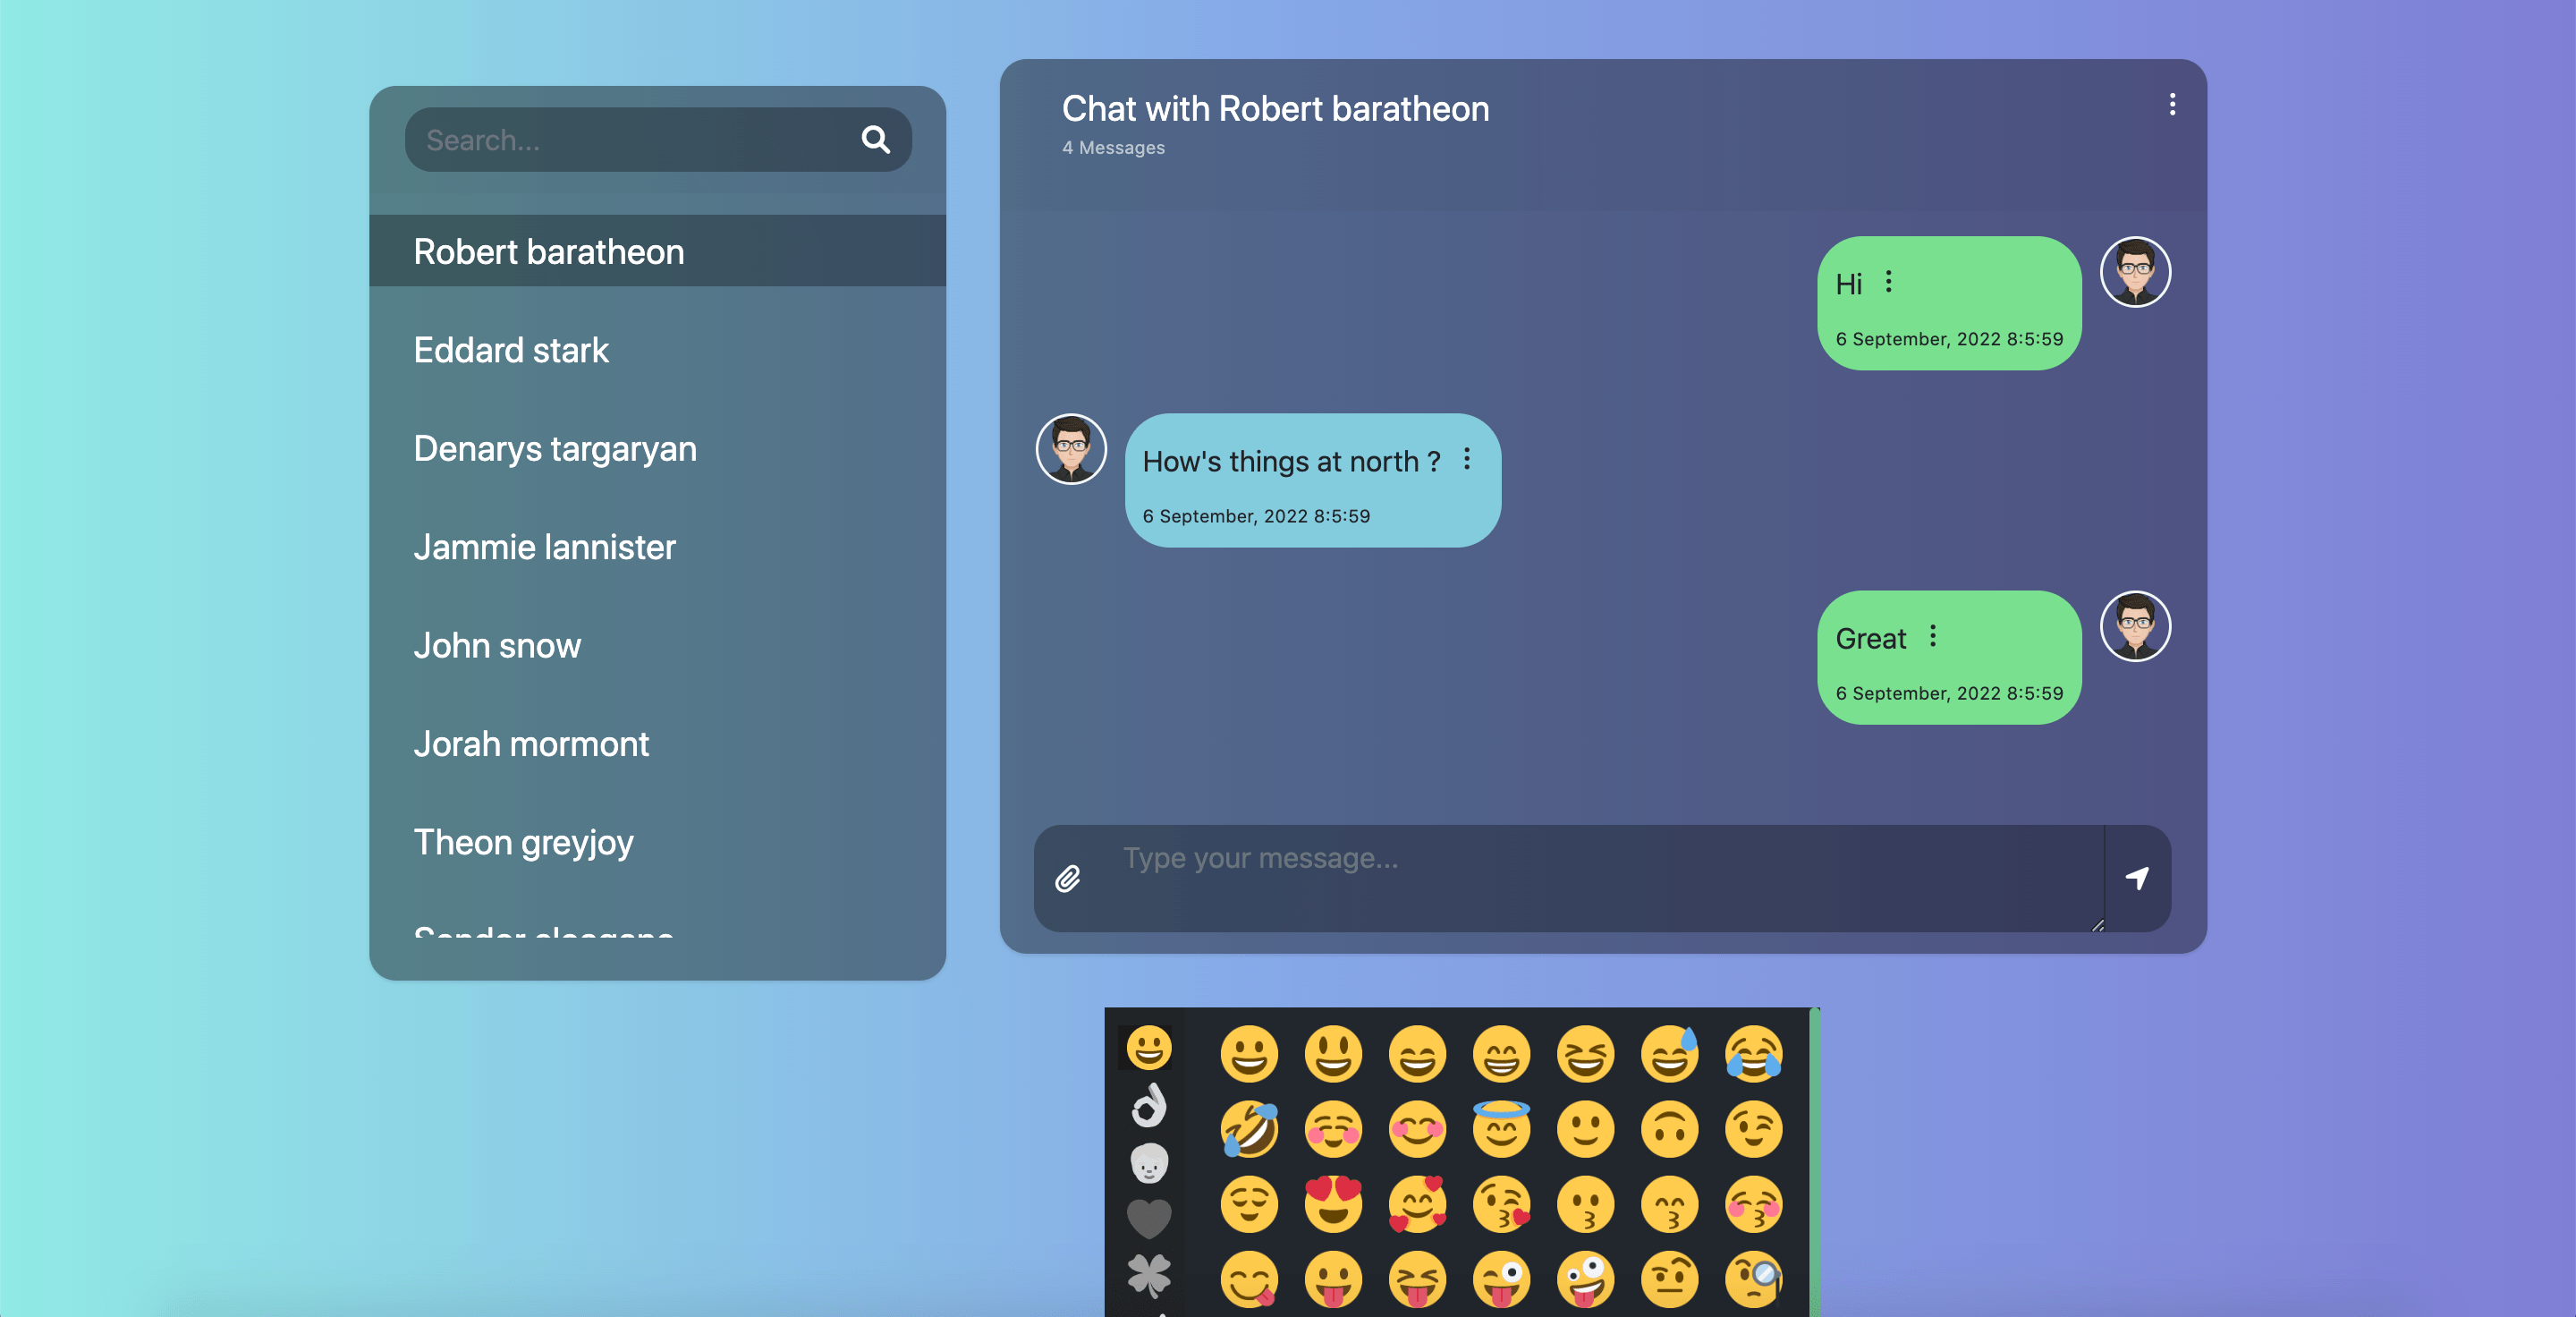
Re-designed
I re-designed the website into a beautiful template. That’s how it looks now.
So you will be learning to create a full-stack chat app from scratch using Node JS, Mongo DB, and Vue JS. Again, you can find the tutorial for the complete series here. Enjoy!
In this tutorial, we are going to teach you, how you can encrypt and decrypt the strings using Node JS and Mongo DB. The encrypted strings will be saved in the database and upon retrieval will be decrypted.
Setup the Project
First, create an empty folder and open a command prompt in it. Then run the following commands in it one by one:
crypto module will be used to encrypt and decrypt the strings. ejs module will be used to render HTML files. Then create a file named server.js at the root of folder. Open server.js file and write the following code in it:
// initialize express JS
const express = require("express");
const app = express();

// create HTTP server
const http = require("http").createServer(app);

// [include Mongo DB module here]

// start the server
http.listen(process.env.PORT || 3000, function () {
    console.log("Server started running...");

    // [connect with Mongo DB here]
});
Open your terminal and you will see the message that the server has been started. You can access your project at http://localhost:3000/
Setup Mongo DB
Write the following lines in place of [include Mongo DB module here] section in your server.js file:
// include mongo DB
var mongodb = require("mongodb");
var MongoClient = mongodb.MongoClient;
Then connect the database in the [connect with Mongo DB here] section:
// connect with mongo DB server
MongoClient.connect("mongodb://localhost:27017", function (error, client) {
    if (error) {
        console.error(error);
        return;
    }

    // set database
    db = client.db("encrypt_decrypt_string");
    console.log("Database connected");

    // [routes goes here]

});
Save the file and open your terminal, now you will see another message that the database has been connected as well.
Encrypt the String
First, include the crypto module at the top of your server.js file:
// include crypto module
const crypto = require("crypto")

// set encryption algorithm
const algorithm = 'aes-256-cbc'

// private key
const key = "adnan-tech-programming-computers" // must be of 32 characters

// random 16 digit initialization vector
const iv = crypto.randomBytes(16)
The key and initialization vector can be any string of 32 and 16 characters respectively. But it is recommended to keep the key hard-coded and initialization vector to be random. Because IV will be saved in database.
We cannot save the key in the database, because if the database gets hacked then all your encrypted strings will be compromised as well.
After that, create a GET route that will encrypt the string and save in Mongo DB. Write the following code in the [routes goes here] section:
// route to encrypt the message
app.get("/encrypt/:message", async function (request, result) {
    // get message from URL
    const message = request.params.message;

	// random 16 digit initialization vector
	const iv = crypto.randomBytes(16);

    // encrypt the string using encryption algorithm, private key and initialization vector
    const cipher = crypto.createCipheriv(algorithm, key, iv);
    let encryptedData = cipher.update(message, "utf-8", "hex");
    encryptedData += cipher.final("hex");

    // convert the initialization vector to base64 string
    const base64data = Buffer.from(iv, 'binary').toString('base64');

    // save encrypted string along wtih initialization vector in database
    await db.collection("strings").insertOne({
        iv: base64data,
        encryptedData: encryptedData
    });

    // show the encrypted message
    result.send(encryptedData);
});
You can write any string in the URL and you will see the encrypted text in the browser and also in your Mongo DB.
Show all Encrypted Strings
To show all encrypted strings, we are going to use a module named ejs. Write the following line at the top of your server.js file:
// set templating engine as EJS
app.set("view engine", "ejs");
The create the following GET route to show all encrypted strings:
// route to show all encrypted messages
app.get("/", async function (request, result) {
    // get all data from database
    const data = await db.collection("strings")
        .find({})
        .sort({
            _id: -1
        }).toArray();

    // render index.ejs
    result.render("index", {
        data: data
    });
});
Create a new folder named views and inside it create a file named index.ejs. It will have the following code:
<table>
    <% for (let d in data) { %>
        <tr>
            <td>
                <a href="/decrypt/<%= data[d].encryptedData %>" target="_blank">
                    <%= data[d].encryptedData %>
                </a>
            </td>
        </tr>
    <% } %>
</table>
Access the URL: http://localhost:3000/ and you will see all your encrypted strings in descending order.
Decrypt the String
To decrypt the string, create a GET route and fetch the encrypted string and initialization vector from Mongo DB. Then we can apply the decryption using key.
// route to decrypt the message
app.get("/decrypt/:encrypted", async function (request, result) {
    // get encrypted text from URL
    const encrypted = request.params.encrypted;

    // check if text exists in database
    const obj = await db.collection("strings").findOne({
        encryptedData: encrypted
    });

    if (obj == null) {
        result.status(404).send("Not found");
        return;
    }

    // convert initialize vector from base64 to buffer
    const origionalData = Buffer.from(obj.iv, 'base64')

    // decrypt the string using encryption algorithm and private key
    const decipher = crypto.createDecipheriv(algorithm, key, origionalData);
    let decryptedData = decipher.update(obj.encryptedData, "hex", "utf-8");
    decryptedData += decipher.final("utf8");

    // display the decrypted string
    result.send(decryptedData);
});
If you click on any string now, you will see the actual string.
In this article, we are going to teach you, how you can detect page leave event using Javascript. Sometimes we would want some action, like an AJAX call when the user leave the page and move to another tab. Or minimize the browser.
We will create a simple video tag. And we will pause the video as soon as the user leaves the tab using Javascript. Also, we will play the video when the user comes back again on the site.
The src attribute will be the path of the video file.
The width is 100% so the video will not overflow the webpage.
controls attribute to display play/pause, volume up/down, and other controls.
Unique ID so it can be accessible in Javascript.
At this point, you will see a video player on your website. If you play the video and move to another tab, the video will keep playing in the background. So the following Javascript code will make sure the video gets paused as soon as the user leaves the tab, and play the video back when the user re-enters the tab.
const video = document.getElementById("video");

document.addEventListener("visibilitychange", function () {
    if (document["hidden"]) {
        video.pause();
    } else {
        video.play();
    }
});
Refresh the page and play the video again. Now if you move to another tab, you will see that the video automatically gets paused and resumed from the same point where it was left when you re-open the tab.
So that’s how you can detect page leave event on your website using simple and plain Javascript. You can check out our other Javascript tutorials to learn more about Javascript.