Pass value from recycler view adapter to activity – Android Kotlin

In this tutorial, we will teach you how you can pass value from the recycler view adapter to activity in Kotlin. First, you need to create an interface:

// file name = RVInterface.kt

package com.adnantech.myapp

import android.view.View

interface RVInterface {
    fun onClick(view: View)
}

Here, “RVInterface” is short for “Recycler View Interface”. Now, suppose we have the following model class:

// file name = User.kt

package com.adnantech.myapp

class User(val name: String) {
    //
}

And we create an array list of 3 users.

val users: ArrayList<User> = ArrayList()
users.add(User("Adnan"))
users.add(User("Tech"))
users.add(User("Developer"))

Then you need to create an instance of your interface in your activity class:

private val rvInterfaceInstance: RVInterface = object : RVInterface {
    override fun onClick(view: View) {
        val index: Int = recyclerView.getChildAdapterPosition(view)
        if (users.size > index) {
            Log.i("mylog", users[index].name)
        }
    }
}

This will override the “onClick” function created in the interface. When this function is called, it will get the item’s index in the recycler view. Check the index must not be outbound in the “users” array. Then display the user name in logcat.

After that, you need to pass this interface instance to your adapter:

val adapter: UsersAdapter = UsersAdapter(users, rvInterfaceInstance)

Since we are sending the interface instance as a parameter, so we can easily get it in our adapter’s constructor:

class UsersAdapter(
    private var users: ArrayList<User>,
    private var rvInterfaceInstance: RVInterface
)

And finally in your adapter, inside the “onBindViewHolder” method, we can call the following function to call the interface method inside the activity class:

holder.itemView.setOnClickListener {
    rvInterfaceInstance.onClick(holder.itemView)
}

This will call the interface method when the item in the adapter is clicked. But you can add it to any button click listener as well.

Download files in storage – Android kotlin

Previously, we created a tutorial to show you how you can download an image in your storage using Java. In this tutorial, we will show you how you can download any file in your android phone’s storage using Kotlin. First, you need to create a file named “DownloadImageTask.kt” and write the following code in it:

class DownloadImageTask(
    var imagePath: String?,
    var fileName: String?
) : AsyncTask<Void, Void, Void>() {

    var cachePath: String = ""

    override fun doInBackground(vararg voids: Void?): Void? {
        try {
            val root =
                Environment.getExternalStoragePublicDirectory(Environment.DIRECTORY_DOCUMENTS)
            val directoryPath = File(root.absolutePath + "/")
            if (!directoryPath.exists()) {
                directoryPath.mkdir()
            }
            val cachePath = File("$directoryPath/$fileName")
            cachePath.createNewFile()
            val buffer = ByteArray(1024)
            var bufferLength: Int
            val url = URL(imagePath)
            val urlConnection = url.openConnection() as HttpURLConnection
            urlConnection.requestMethod = "GET"
            urlConnection.doOutput = false
            urlConnection.connect()
            val inputStream = urlConnection.inputStream
            val fileOutput = FileOutputStream(cachePath)
            while (inputStream.read(buffer).also { bufferLength = it } > 0) {
                fileOutput.write(buffer, 0, bufferLength)
            }
            fileOutput.write(buffer)
            fileOutput.close()
            inputStream.close()

            this.cachePath = cachePath.toString()
        } catch (e: FileNotFoundException) {
            e.printStackTrace()
        } catch (e: ProtocolException) {
            e.printStackTrace()
        } catch (e: IOException) {
            e.printStackTrace()
        }
        return null
    }

    override fun onPostExecute(aVoid: Void?) {
        // when the operation is done
        // you can use this.cachePath here
    }
}

Now, whenever you want to download any file, you just need to run the following line passing the file’s absolute path in the first parameter. And the file name as the second parameter. The second parameter file name will be the name that will be saved in your phone’s storage.

DownloadImageTask("https://www.nasa.gov/sites/default/files/styles/full_width_feature/public/thumbnails/image/stsci-01gfnn3pwjmy4rqxkz585bc4qh.png", "nasa.png")
                .execute()

That’s how you can download any HTTP file in your android phone’s storage using Kotlin. If you face any problem in following this, kindly do let me know in the comments section below.

Display HTTP images in ImageView – Android kotlin

In this tutorial, we will show you how you can display HTTP images in your ImageView in your android app using Kotlin. We will be displaying this image “https://www.nasa.gov/sites/default/files/styles/full_width_feature/public/thumbnails/image/stsci-01gfnn3pwjmy4rqxkz585bc4qh.png” in our image view.

Then create a file named “FetchImageFromInternet.kt” and write the following code in it:

package com.adnantech.myapp

import android.annotation.SuppressLint
import android.graphics.Bitmap
import android.graphics.BitmapFactory
import android.os.AsyncTask
import android.util.Log
import android.widget.ImageView
import android.widget.Toast

@SuppressLint("StaticFieldLeak")
@Suppress("DEPRECATION")
class FetchImageFromInternet(var imageView: ImageView) : AsyncTask<String, Void, Bitmap?>() {
    init {
//        Toast.makeText(applicationContext, "Please wait, it may take a few minute...",     Toast.LENGTH_SHORT).show()
    }
    override fun doInBackground(vararg urls: String): Bitmap? {
        val imageURL = urls[0]
        var image: Bitmap? = null
        try {
            val `in` = java.net.URL(imageURL).openStream()
            image = BitmapFactory.decodeStream(`in`)
        }
        catch (e: Exception) {
            Log.e("Error Message", e.message.toString())
            e.printStackTrace()
        }
        return image
    }
    override fun onPostExecute(result: Bitmap?) {
        imageView.setImageBitmap(result)
    }
}

And this will be your image view:

<ImageView
    android:id="@+id/imageView"
    android:layout_width="match_parent"
    android:layout_height="wrap_content"
    android:scaleType="fitCenter" />

Then whenever you want to display an HTTP image, just write the following lines:

val imageView: ImageView = findViewById(R.id.imageView)

FetchImageFromInternet(imageView)
    .execute("https://www.nasa.gov/sites/default/files/styles/full_width_feature/public/thumbnails/image/stsci-01gfnn3pwjmy4rqxkz585bc4qh.png")

Run the app now and you will be able to view that HTTP image in your app. Check out our more tutorials on android.

Select file from internal storage – Android kotlin

To select a file from internal storage in android using Kotlin, first, you have to start an intent with a request code.

val intent = Intent(Intent.ACTION_PICK)
intent.type = "*/*"
startActivityForResult(intent, 565)

After that, when the image is selected from the gallery by the user, it will be received in the onActivityResult method. So we need to create the following methods in our activity:

override fun onActivityResult(requestCode: Int, resultCode: Int, data: Intent?) {
    super.onActivityResult(requestCode, resultCode, data)
    if (resultCode == Activity.RESULT_OK && requestCode == 565) {
        val uri: Uri? = data?.data

        var base64: String = ""
        try {
            val bytes = uri?.let { contentResolver.openInputStream(it)?.readBytes() }
            base64 = Base64.encodeToString(bytes, Base64.URL_SAFE)
        } catch (e1: IOException) {
            e1.printStackTrace()
        }

        var attachmentName: String = uri?.let { getFileName(it, contentResolver) }.toString()

        var extension: String = uri?.let {
            getMimeType(
                applicationContext,
                it
            )
        }.toString()

        Log.i("mylog, base64 = ", base64)
        Log.i("mylog, attachment = ", attachmentName)
        Log.i("mylog, extension = ", extension)
    }
}

fun getFileName(uri: Uri, contentResolver: ContentResolver): String {
    val returnCursor: Cursor = contentResolver.query(uri, null, null, null, null)!!
    val nameIndex = returnCursor.getColumnIndex(OpenableColumns.DISPLAY_NAME)
    returnCursor.moveToFirst()
    val name = returnCursor.getString(nameIndex)
    returnCursor.close()

    return name
}

fun getMimeType(context: Context, uri: Uri): String? {
    return if (uri.scheme == ContentResolver.SCHEME_CONTENT) {
        //If scheme is a content
        val mime = MimeTypeMap.getSingleton()
        mime.getExtensionFromMimeType(context.contentResolver.getType(uri))
    } else {
        //If scheme is a File
        //This will replace white spaces with %20 and also other special characters. This will avoid returning null values on file name with spaces and special characters.
        MimeTypeMap.getFileExtensionFromUrl(Uri.fromFile(File(uri.path)).toString())
    }
}

Run the app now, you will be able to select any file from your internal or external storage (if you have external storage). After you select the file, you will see its base64 content, file name, and its extension in the logcat of android studio.

Pass headers with Volley – Android kotlin

In the Android Volley library, you can pass headers with an HTTP request using Kotlin. Headers are used to pass additional information. Following will be the code to pass headers with the Volley library:

val queue = Volley.newRequestQueue(this)
val url = "http://172.20.10.4:3000/getUser"

val requestBody = ""
val stringReq: StringRequest =
    object : StringRequest(
        Method.POST, url,
        Response.Listener { response ->

            Log.i("mylog", response)

        },
        Response.ErrorListener { error ->
            Log.i("mylog", "error = " + error)
        }
    ) {
        override fun getHeaders(): MutableMap<String, String> {
            val headers = HashMap<String, String>()
            headers["Authorization"] = "Bearer {your_access_token}"
            return headers
        }

        override fun getBody(): ByteArray {
            return requestBody.toByteArray(Charset.defaultCharset())
        }
    }
queue.add(stringReq)

If you want to see how you can handle headers in the backend in Node JS, you are free to check our GitHub repo.

Left menu drawer – Android kotlin

In this article, we will be creating a left menu drawer in an android app using Kotlin. Following will be the code of your activity:

package com.adnantech.myapp

import androidx.appcompat.app.AppCompatActivity
import android.os.Bundle
import android.view.MenuItem
import androidx.appcompat.app.ActionBarDrawerToggle
import androidx.drawerlayout.widget.DrawerLayout
import com.google.android.material.navigation.NavigationView

class HomeActivity : AppCompatActivity(), NavigationView.OnNavigationItemSelectedListener {

    lateinit var drawerLayout: DrawerLayout
    lateinit var actionBarDrawerToggle: ActionBarDrawerToggle
    lateinit var navigationView: NavigationView

    override fun onCreate(savedInstanceState: Bundle?) {
        super.onCreate(savedInstanceState)
        setContentView(R.layout.activity_home)

        // drawer layout instance to toggle the menu icon to open
        // drawer and back button to close drawer
        drawerLayout = findViewById(R.id.drawer_layout)
        actionBarDrawerToggle =
            ActionBarDrawerToggle(this, drawerLayout, R.string.nav_open, R.string.nav_close)

        // pass the Open and Close toggle for the drawer layout listener
        // to toggle the button
        drawerLayout.addDrawerListener(actionBarDrawerToggle)
        actionBarDrawerToggle.syncState()

        // to make the Navigation drawer icon always appear on the action bar
        supportActionBar?.setDisplayHomeAsUpEnabled(true)

        navigationView = findViewById(R.id.navigationView)
        navigationView.setNavigationItemSelectedListener(this)
    }

    override fun onNavigationItemSelected(item: MenuItem): Boolean {
        val id: Int = item.itemId
        if (id == R.id.nav_logout) {
            // logout action
        }
        return true
    }

    // override the onOptionsItemSelected()
    // function to implement
    // the item click listener callback
    // to open and close the navigation
    // drawer when the icon is clicked
    override fun onOptionsItemSelected(item: MenuItem): Boolean {
        return if (actionBarDrawerToggle.onOptionsItemSelected(item)) {
            true
        } else super.onOptionsItemSelected(item)
    }
}

You need to implement and interface “NavigationView.OnNavigationItemSelectedListener” to your activity. Create instances of “DrawerLayout”, “ActionBarDrawerToggle”, and “NavigationView”.

Create the following 2 attributes in your “res/values/strings.xml”:

<resources>
    <string name="app_name">My App</string>

    <!-- to toggle the open close button of the navigation drawer -->
    <string name="nav_open">Open</string>
    <string name="nav_close">Close</string>
</resources>

And your “activity_home.xml” should look like this:

<?xml version="1.0" encoding="utf-8"?>
<androidx.drawerlayout.widget.DrawerLayout xmlns:android="http://schemas.android.com/apk/res/android"
    xmlns:app="http://schemas.android.com/apk/res-auto"
    xmlns:tools="http://schemas.android.com/tools"
    android:id="@+id/drawer_layout"
    android:layout_width="match_parent"
    android:layout_height="match_parent">

    <RelativeLayout
        android:layout_width="match_parent"
        android:layout_height="match_parent">

        <TextView
            android:layout_width="wrap_content"
            android:layout_height="wrap_content"
            android:text="Home content" />
    </RelativeLayout>

    <!-- this the navigation view which draws and shows the navigation drawer -->
    <!-- include the menu created in the menu folder -->
    <com.google.android.material.navigation.NavigationView
        android:id="@+id/navigationView"
        android:layout_width="wrap_content"
        android:layout_height="match_parent"
        android:layout_gravity="start"
        app:headerLayout="@layout/home_drawer_header"
        app:menu="@menu/navigation_menu" />

</androidx.drawerlayout.widget.DrawerLayout>

After that, we need to create 2 files. One named “home_drawer_header.xml” inside the “res/layout” folder. And another named “navigation_menu.xml” inside the “res/menu” folder. Following will be the code of the “res/layout/home_drawer_header.xml” file:

<?xml version="1.0" encoding="utf-8"?>
<RelativeLayout xmlns:android="http://schemas.android.com/apk/res/android"
    android:layout_width="match_parent"
    android:layout_height="100dp"
    android:padding="20dp">

    <TextView
        android:id="@+id/userName"
        android:layout_width="match_parent"
        android:layout_height="wrap_content"
        android:layout_centerVertical="true"
        android:text="adnan" />

    <TextView
        android:id="@+id/userPhone"
        android:layout_width="match_parent"
        android:layout_height="wrap_content"
        android:layout_below="@+id/userName"
        android:layout_centerVertical="true"
        android:text="12345" />

</RelativeLayout>

And the code of “res/menu/navigation_menu.xml” should be like the following:

<?xml version="1.0" encoding="utf-8"?>
<menu xmlns:android="http://schemas.android.com/apk/res/android"
    xmlns:tools="http://schemas.android.com/tools"
    tools:ignore="HardcodedText">

    <item
        android:id="@+id/nav_account"
        android:title="My account" />

    <item
        android:id="@+id/nav_settings"
        android:title="Settings" />

    <item
        android:id="@+id/nav_logout"
        android:title="Logout" />

</menu>

If you want to get the TextView inside navigation views, you can get them by using the following code:

val headerView: View = navigationView.getHeaderView(0)
val userName: TextView = headerView.findViewById(R.id.userName)
val userPhone: TextView = headerView.findViewById(R.id.userPhone)

Run the app now and you will be able to see the left menu drawer like this:

Left menu drawer - Android Kotlin
Left menu drawer – Android Kotlin

Feel free to post a comment below if you face any problems following this. Follow more of our android tutorials here.

Login with JWT – Kotlin, Node JS, Mongo DB

In this tutorial, we will teach you how you can login a user with JWT (JSON Web Token) in the android app using Kotlin and Node JS. We will be using Node JS to generate JWT and Mongo DB to save it.

Creating an activity

First, we will create an empty activity named “LoginActivity.kt”. Following will be the code of that file:

package com.adnantech.myapp

import android.content.Intent
import androidx.appcompat.app.AppCompatActivity
import android.os.Bundle

class LoginActivity : AppCompatActivity() {

    override fun onCreate(savedInstanceState: Bundle?) {
        super.onCreate(savedInstanceState)
        setContentView(R.layout.activity_login)
    }
}

This will look for a file named “activity_login.xml” inside the “res/layout” folder.

Create an XML file

Then we will create a file named “activity_login.xml” inside the “res/layout” folder. That file will have the following code:

<?xml version="1.0" encoding="utf-8"?>
<RelativeLayout xmlns:android="http://schemas.android.com/apk/res/android"
    android:layout_width="match_parent"
    android:layout_height="match_parent"
    android:layout_margin="20dp"
    tools:context=".LoginActivity">

    <TextView
        android:id="@+id/heading"
        android:layout_width="match_parent"
        android:layout_height="wrap_content"
        android:text="Login"
        android:textAlignment="center"
        android:textSize="40sp"
        android:textStyle="bold" />

    <EditText
        android:id="@+id/etPhone"
        android:layout_width="match_parent"
        android:layout_height="wrap_content"
        android:layout_below="@+id/heading"
        android:layout_marginTop="20dp"
        android:hint="Enter phone"
        android:inputType="phone" />

    <EditText
        android:id="@+id/etPassword"
        android:layout_width="match_parent"
        android:layout_height="wrap_content"
        android:layout_below="@+id/etPhone"
        android:layout_marginTop="20dp"
        android:hint="Enter password"
        android:inputType="textPassword" />

    <Button
        android:id="@+id/btnLogin"
        android:layout_width="match_parent"
        android:layout_height="wrap_content"
        android:layout_below="@+id/etPassword"
        android:layout_marginTop="20dp"
        android:text="Login" />

</RelativeLayout>

It will display the heading “Login” horizontally center-aligned. Two input fields. One to enter the phone number, and one for the password. It will also display a button that when clicked will call an HTTP request to authenticate the user.

Button onclick event listener

We need to attach an “onclick” event listener to the button. So we will create instances of all our input fields and button.

class LoginActivity : AppCompatActivity() {

    private lateinit var etPhone: EditText
    private lateinit var etPassword: EditText
    private lateinit var btnLogin: Button

    override fun onCreate(savedInstanceState: Bundle?) {
        super.onCreate(savedInstanceState)
        setContentView(R.layout.activity_login)

        etPhone = findViewById(R.id.etPhone)
        etPassword = findViewById(R.id.etPassword)
        btnLogin = findViewById(R.id.btnLogin)

        btnLogin.setOnClickListener {
            doLogin()
        }
    }

    private fun doLogin() {
        // [HTTP request to authenticate the user]
    }
}

And inside this button click listener, we are calling our method that will call an HTTP request.

Calling an HTTP request

To call an HTTP request, first, make sure you have INTERNET and ACCESS_NETWORK_STATE permissions added in your “AndroidManifest.xml” file.

<uses-permission android:name="android.permission.ACCESS_NETWORK_STATE" />
<uses-permission android:name="android.permission.INTERNET" />

Then you need to add the following line in your “app/build.gradle” file:

implementation "com.android.volley:volley:1.2.1"

Make sure to “Gradle sync” after pasting that line. You will see the option to sync Gradle on top in Android studio. After that, you need to write the following code in the [HTTP request to authenticate the user] section:

btnLogin.isEnabled = false

val queue = Volley.newRequestQueue(this)
val url = "http://172.20.10.4:3000/login"

val requestBody =
    "phone=" + URLEncoder.encode(
        etPhone.text.toString(),
        "UTF-8"
    ) + "&password=" + etPassword.text
val stringReq: StringRequest =
    object : StringRequest(
        Method.POST, url,
        Response.Listener { response ->
            btnLogin.isEnabled = true
            Log.i("mylog", response)
        },
        Response.ErrorListener { error ->
            Log.i("myLog", "error = " + error)
        }
    ) {
        override fun getBody(): ByteArray {
            return requestBody.toByteArray(Charset.defaultCharset())
        }
    }
queue.add(stringReq)

This will first disable the login button. Then it will create an instance of Volley. After that, it sets the path of an API. You can get your IP address by running either of the following commands in your terminal:

> ipconfig /all
or
> ifconfig

You need to copy the ipv4 address and paste it as your IP address.

Then it creates a request body, the parameters that will be sent to the API. Creates an instance of “StringRequest”. When the response is received, it simply enables the login button and displays the response in the log. You can view the response by opening your “logcat” in your android studio bottom bar. And select “info” and search for “mylog”.

If you want to convert the JSON string into Kotlin class, you can check out this tutorial.

We have already created a public GitHub repo for the authentication API. You can check it out here.

So that’s how you can create a login activity in android using Kotlin with Node JS and Mongo DB as the backend. If you face any problem in following this, kindly do let me know.

User registration – Kotlin, Node JS, Mongo DB

This tutorial will create an android user registration activity in Kotlin. You will learn the following:

  • How to use Node JS API for android apps
  • How to call HTTP request with POST method in Kotlin

Creating an activity

First, we will create an empty activity named “RegisterActivity.kt”. Following will be the code of that file:

package com.adnantech.myapp

import android.os.Bundle
import androidx.appcompat.app.AppCompatActivity

class RegisterActivity : AppCompatActivity() {

    override fun onCreate(savedInstanceState: Bundle?) {
        super.onCreate(savedInstanceState)
        setContentView(R.layout.activity_register)
    }
}

This will look for a file named “activity_register.xml” inside the “res/layout” folder.

Create an XML file

Then we will create a file named “activity_register.xml” inside the “res/layout” folder. That file will have the following code:

<?xml version="1.0" encoding="utf-8"?>
<RelativeLayout xmlns:android="http://schemas.android.com/apk/res/android"
    android:layout_width="match_parent"
    android:layout_height="match_parent"
    android:layout_margin="20dp">

    <TextView
        android:id="@+id/heading"
        android:layout_width="match_parent"
        android:layout_height="wrap_content"
        android:text="Register"
        android:textAlignment="center"
        android:textSize="40sp"
        android:textStyle="bold" />

    <EditText
        android:id="@+id/etName"
        android:layout_width="match_parent"
        android:layout_height="wrap_content"
        android:layout_below="@+id/heading"
        android:layout_marginTop="20dp"
        android:hint="Enter name" />

    <EditText
        android:id="@+id/etPhone"
        android:layout_width="match_parent"
        android:layout_height="wrap_content"
        android:layout_below="@+id/etName"
        android:layout_marginTop="20dp"
        android:hint="Enter phone"
        android:inputType="phone" />

    <EditText
        android:id="@+id/etPassword"
        android:layout_width="match_parent"
        android:layout_height="wrap_content"
        android:layout_below="@+id/etPhone"
        android:layout_marginTop="20dp"
        android:hint="Enter password"
        android:inputType="textPassword" />

    <Button
        android:id="@+id/btnRegister"
        android:layout_width="match_parent"
        android:layout_height="wrap_content"
        android:layout_below="@+id/etPassword"
        android:layout_marginTop="20dp"
        android:text="Register" />

</RelativeLayout>

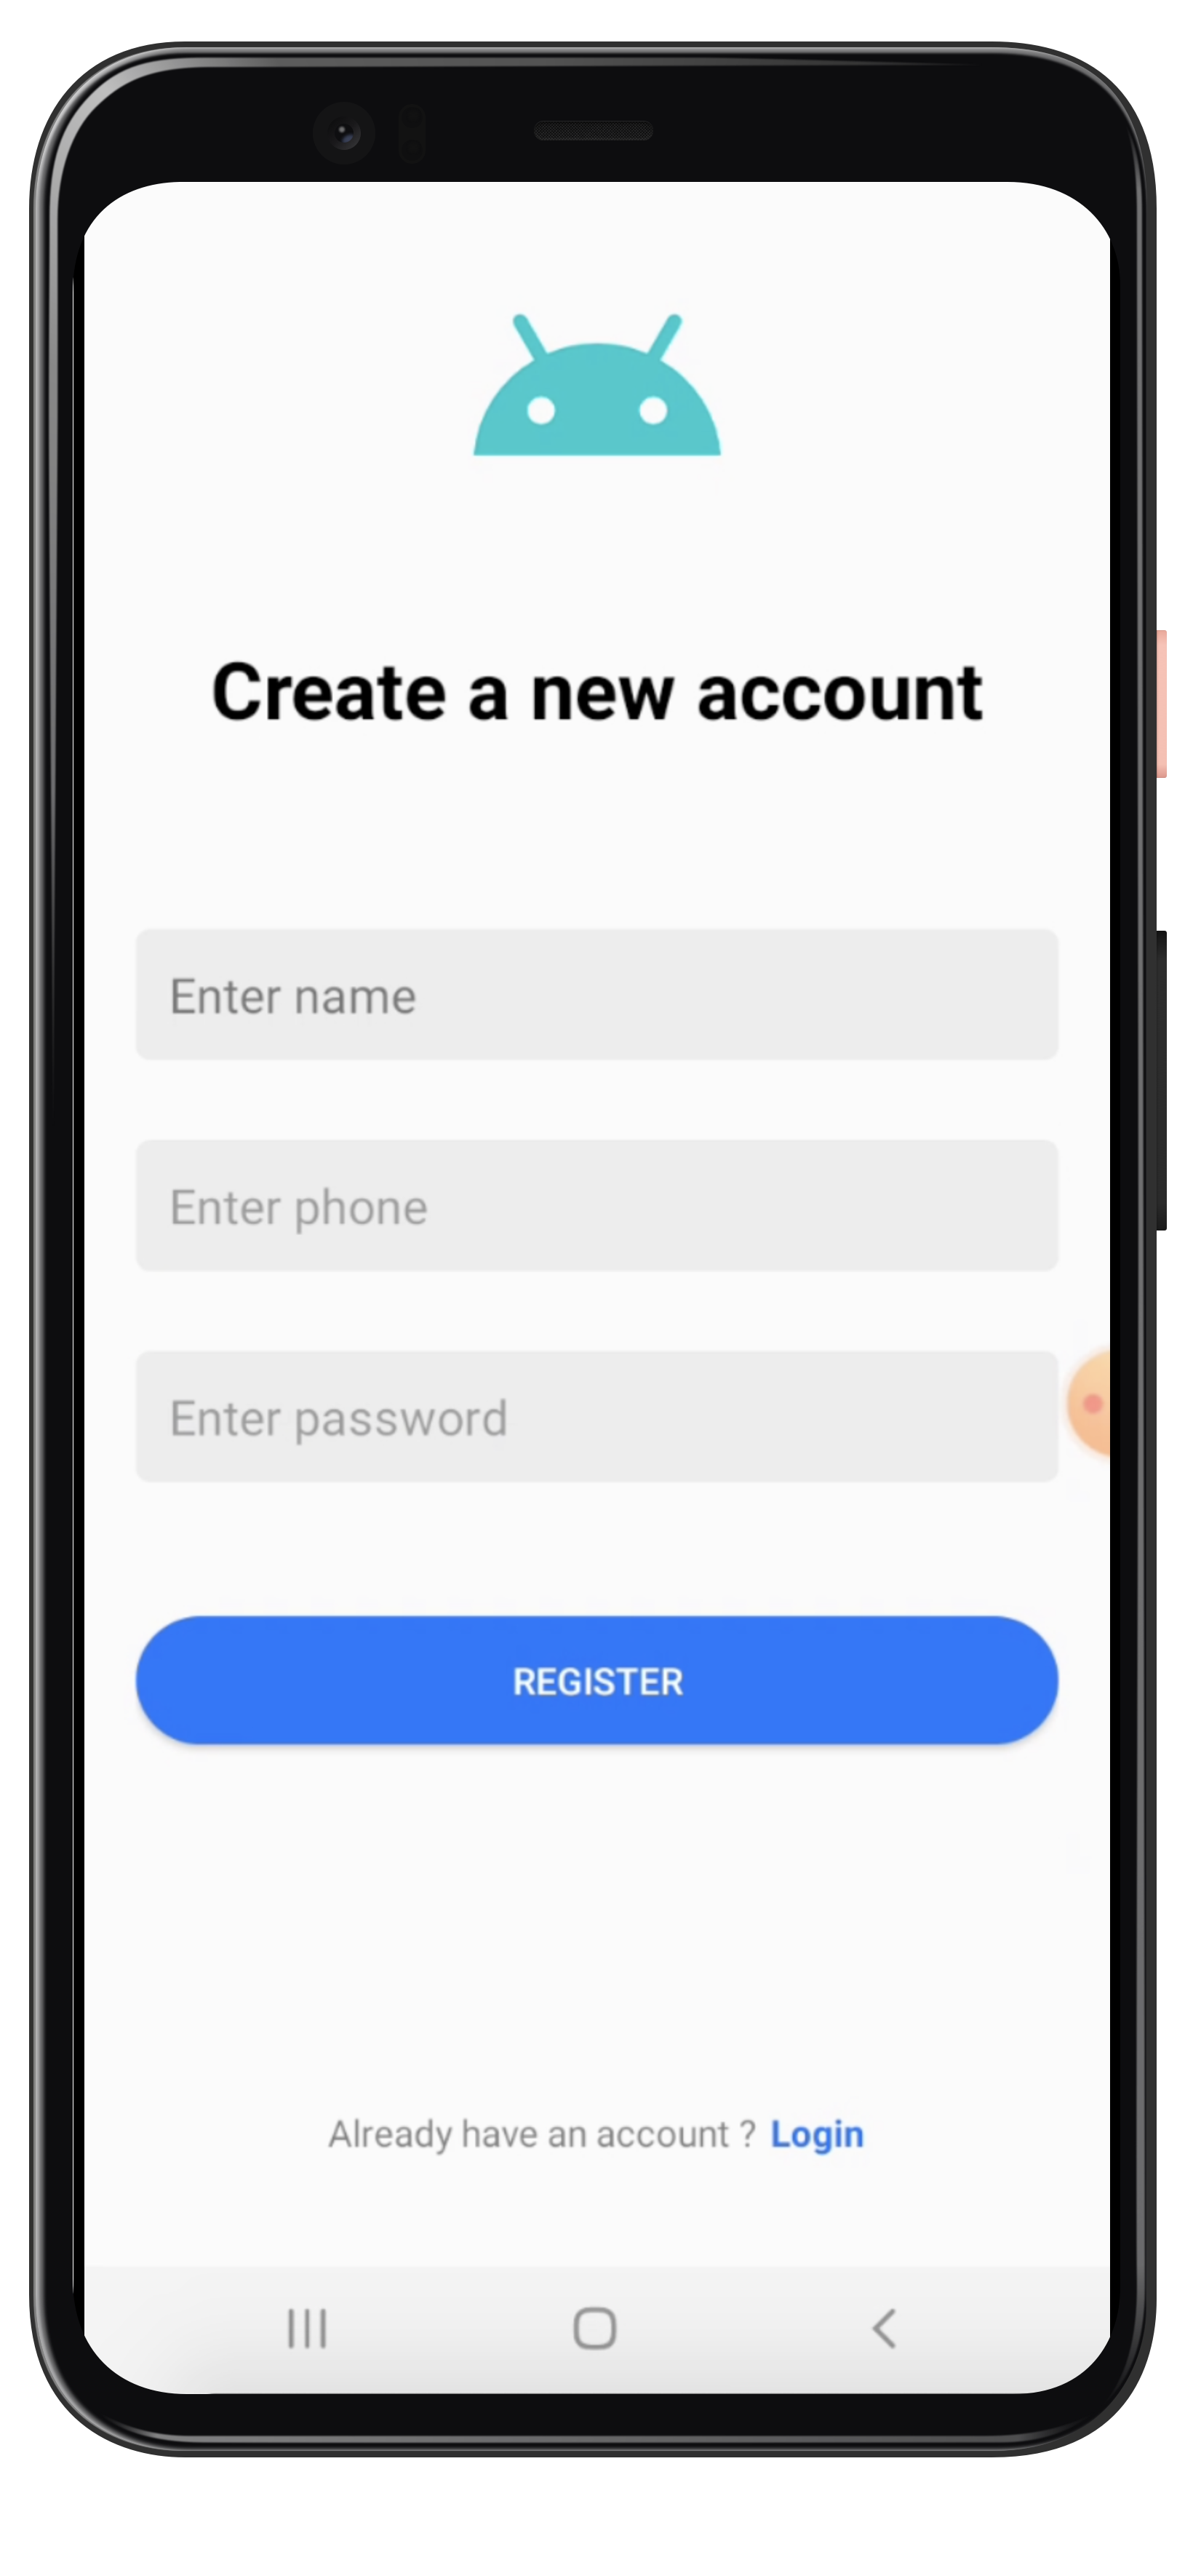
It will display the heading “Register” horizontally center-aligned. Three input fields. One to enter the name, one for the phone number, and one for the password. It will also display a button that when clicked will call an HTTP request to save that data.

Button onclick event listener

We need to attach an “onclick” event listener to the button. So we will create instances of all our input fields and button.

class RegisterActivity : AppCompatActivity() {

    private lateinit var etName: EditText
    private lateinit var etPhone: EditText
    private lateinit var etPassword: EditText
    private lateinit var btnRegister: Button

    override fun onCreate(savedInstanceState: Bundle?) {
        super.onCreate(savedInstanceState)
        setContentView(R.layout.activity_register)

        etName = findViewById(R.id.etName)
        etPhone = findViewById(R.id.etPhone)
        etPassword = findViewById(R.id.etPassword)
        btnRegister = findViewById(R.id.btnRegister)

        btnRegister.setOnClickListener {
            doRegister()
        }
    }

    private fun doRegister() {
        // [HTTP request code goes here]
    }
}

And inside this button click listener, we are calling our method that will call an HTTP request.

Calling an HTTP request

To call an HTTP request, first, make sure you have INTERNET and ACCESS_NETWORK_STATE permissions added in your “AndroidManifest.xml” file.

&lt;uses-permission android:name="android.permission.ACCESS_NETWORK_STATE" />
&lt;uses-permission android:name="android.permission.INTERNET" />

Then you need to add the following line in your “app/build.gradle” file:

implementation "com.android.volley:volley:1.2.1"

Make sure to “Gradle sync” after pasting that line. You will see the option to sync Gradle on top in Android studio. After that, you need to write the following code in the [HTTP request code goes here] section:

btnRegister.isEnabled = false

val queue = Volley.newRequestQueue(this)
val url = "http://172.20.10.4:3000/register"

val requestBody =
    "name=" + etName.text + "&phone=" + URLEncoder.encode(etPhone.text.toString(), "UTF-8") + "&password=" + etPassword.text
val stringReq: StringRequest =
    object : StringRequest(Method.POST, url,
        Response.Listener { response ->
            btnRegister.isEnabled = true
            Log.i("mylog", response)
        },
        Response.ErrorListener { error ->
            Log.i("myLog", "error = " + error)
        }
    ) {
        override fun getBody(): ByteArray {
            return requestBody.toByteArray(Charset.defaultCharset())
        }
    }
queue.add(stringReq)

This will first disable the registration button. Then it will create an instance of Volley. After that, it sets the path of an API. You can get your IP address by running either of the following commands in your terminal:

> ipconfig /all
or
> ifconfig

You need to copy the ipv4 address and paste it as your IP address.

Then it creates a request body, the parameters that will be sent to the API. Creates an instance of “StringRequest”. When the response is received, it simply enables the registration button and displays the response in the log. You can view the response by opening your “logcat” in your android studio bottom bar. And select “info” and search for “mylog”.

Converting JSON string response to class

If your API is returning a JSON string in response, then you also need to convert that JSON string response to Kotlin class. You can do that by installing a library called “Gson”. You can easily install it by adding the following line in “app/build.gradle” and running “Gradle sync”:

implementation "com.google.code.gson:gson:2.8.5"

Then create a package named “models” since it is a good practice to keep all your response classes in a separate package. Inside this package, create a file named “GeneralResponse.kt” and write the following code in it:

package com.adnantech.myapp.models

class GeneralResponse {
    lateinit var status: String
    lateinit var message: String
}

When the response is received you simply need to do the following with the “response” string:

val generalResponse: GeneralResponse = Gson().fromJson(response, GeneralResponse::class.java)

This will convert the JSON string into your class object.

Creating an API in Node JS

We already have created a public GitHub repo that will give you a pre-built registration API. You can make the changes as per your needs. Just download the repo. Paste it anywhere on your computer. Run the following commands in the “api” folder:

> npm update
> node server.js

Make sure you have Node JS installed in your system. That’s how you can create a user registration activity in Kotlin with Node JS and Mongo DB as the backend. Check out our tutorials on Android to learn more.

Android chat app in Kotlin and Node JS

We created a chat application in native Android using Kotlin and Node JS. We have used Mongo DB as a database.

Modern and professional UI

End-to-end encryption

Usually, we use encryption but on server side. It has a security issue i.e. plain messages are transmitted through a network that can be read or altered in-transit.

But in this app, we have implemented end-to-end encryption means the encryption and decryption is done on client side rather than on server side. Client will encrypt the message and send it to the server. Server will send the encrypted message to the receiver and the receiver client will do the decryption. So even the server will not be able to read your messages.

We will be using the AES-256-bit length key to generate secret keys. All messages are sent to the server after encryption. So data will remain safe in-transit.

Voice notes

Sending voice notes is a quick way to send messages especially when you are in places when you are in hurry. Instead of typing the message which might cause spelling mistake, you can simply record your audio and send it directly to the receiver inside the app. No need to record the audio from a separate app and attach the audio in a message. You can also listen to your sent or received voice notes within the app.

If you use WhatsApp, you already know how voice notes work. You will learn how to record audio from your android phone and save it in your phone’s storage. Once stored, we will send that MP3 file to the Node JS server. The server will save the file. The user will be able to play that audio from the URL.

All contacts

We are using android contact’s API to fetch all the contacts. So you will learn how to get runtime contacts permission in android.

Private chat

The user can chat with any of his contact numbers as long as the receiver is a registered user.

Chat attachments

Users can attach files in chat messages as well. Images and videos are not compressed at all. So the receiver will see the image in its original quality.

Search contacts

Group chat

Users can chat in groups. Create as many groups as you want. Add members to them and start chatting. What makes it different from other chat apps ? First, it does not allow anyone to add you to a group. You will be invited. You will only start receiving the group notifications when you accept the invitation. Second, this app displays a list of all groups separately. So you can know in which groups you are currently in.

Share status that disappears after 24 hours

In this tutorial, you will:

  • Be able to share your status with all your contacts
  • Exclude some contacts from viewing your status
  • Create multiple lists (e.g. friends, family, colleagues, etc.) so you won’t have to select the contacts each time you upload a status
  • See contacts who have viewed your status/story
  • Download the image or video of status

Seen/unseen messages (blue ticks)

In this part, you will learn how to:

  • Install sockets in android
  • Connect android sockets with the Node JS server
  • Get real-time events on new message
  • Mark messages as read and un-read
  • Get bluetick (like WhatsApp) when the user sees your message

User profile

Search messages

Learn how to apply case in-sensitive sub-string search on all the messages in a chat with any of your contact. You can write any part of text of message and the app will show you the messages that matched your searched string.

Although the messages are end-to-end encrypted, which means that the server will not be able to apply search because server can’t read your messages. But we still found a way to apply search on end-to-end encrypted messages.

How to install

Our TrustPilot Reviews

TrustPilot-reviews